Section 1 teaches you the preliminary
concepts and basic skills.
Section 2 discusses front end technologies
such as HTML, CSS, JS, jQuery, JSON.
Section 3 completes our discussion
on full-stack programming by covering back-end technologies such as
servers, databases, managing IaaS, scaling etc.
Section 4 covers how to write client and
server programs on microcontrollers thus enabling us to connect everyday
objetcs to the Internet (an emerging field called the Internet-of-Things
(IoT)).
In this section we will develop a concept map and vocabulary that will
serve as a foundation for our discussion throughout this guide. We will
first discuss the Client-Server Model; then learn where in the
"Programmer's model" of a computer these client and server programs reside.
We finally learn how these client-server programs communicate with each
other over the Internet using URLs.
By the end of this section you should have a working definition and
a concept map interlinking the following terms:
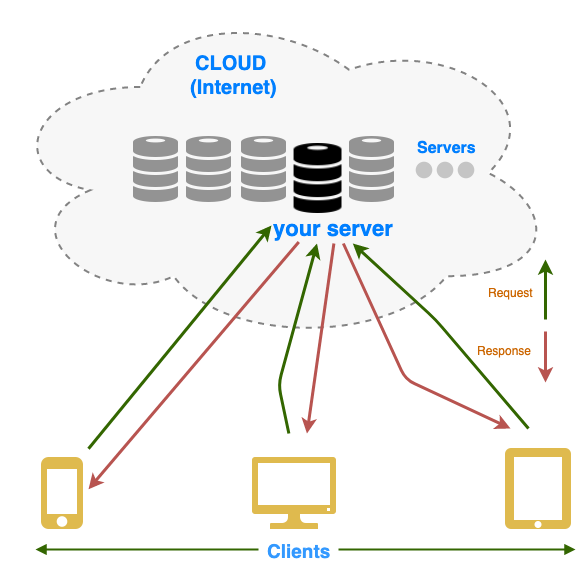
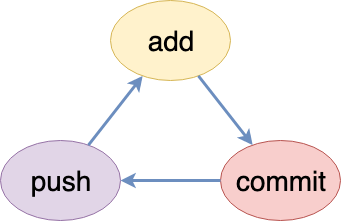
The world wide web is build on top of the client server model. The
client server model consists of clients and servers that communicate
with each other. There are 2 rules in the client server protocol:
The client initiates contact with the server by sending a
request.
The server (whose job is to listen to these client requests),
processes the request and then sends a response back.
Fig: 1.1.1.1. The Client Server Model
The server is an application program and can hence respond differently
based on the request URL's path. For Eg: the URLs https://google.com and
https://google.com/maps both send a request to google.com, but based on the
path (if it has "/maps" or not) a different page is served.
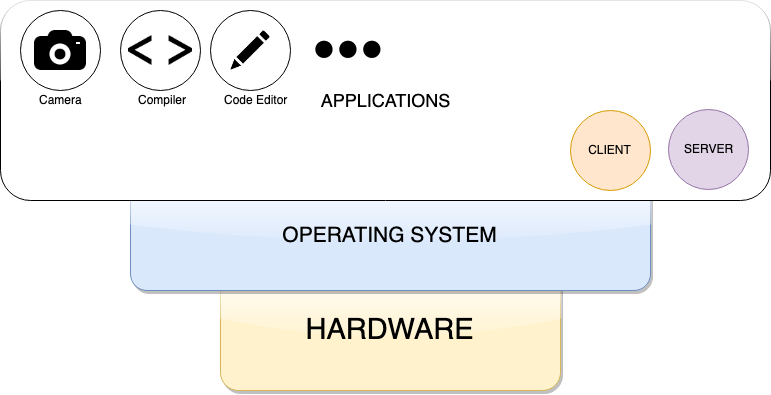
We now know that clients and servers are programs that communicate with one another
according to the client-server model. But where within the nodes of the Internet
(computers, phones, tablets) do clients and servers exist?.
Fig: 1.2.1. Programming model of a Computer
Clients and servers are applications that reside in the application
layer of a computer (see Figure above). For eg. YouTube.com is a server which can be
accessed via a web browser (on computers and phones) or apps (also on
computers and phone). Other examples include GitHub.com, Slack,
Facebook, Google etc. All these "Internet Software" have a server and
client apps as part of their ecosystem. Developing and maintaining these
is referred to as devops (Developer Operations).
This guide focusses on train you in devops for Internet Software
development.
Section 4 of the guide deals with deploying clients and servers on
Microcontrollers (small bare bones computers with no OS, but programmable
firmware).
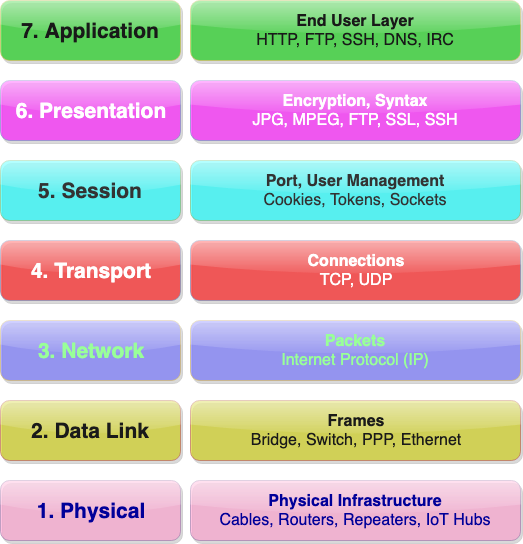
We all have a working definition of what
Internet means to us. However, just like there are different ways to
visualize a computer (as seen in last section), the Internet can
defined from different perspectives. These definitions are related by a
hierarchy called the Open Systems Interconnection (OSI) Model.
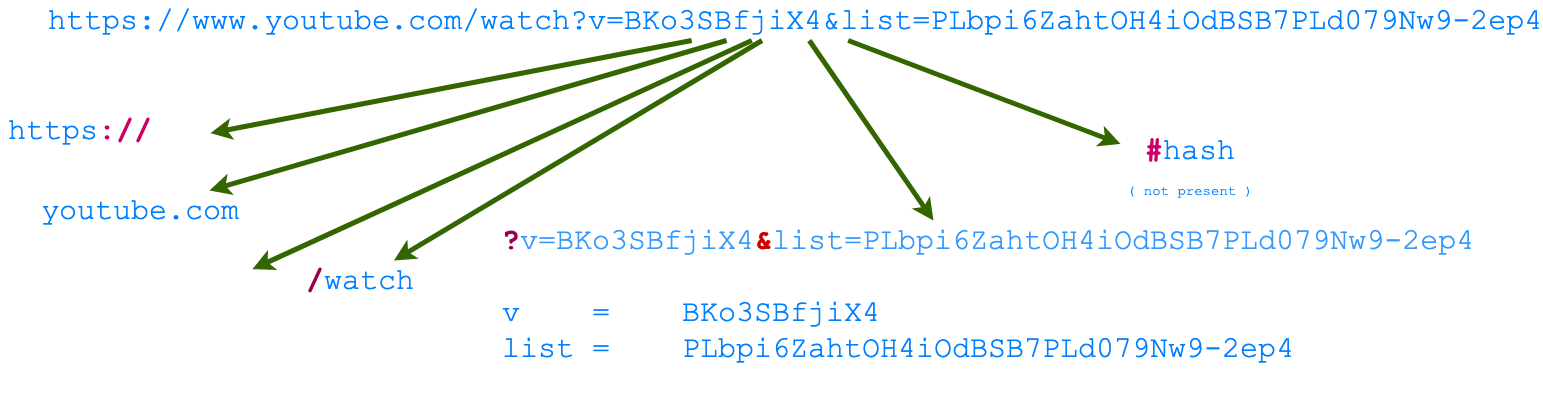
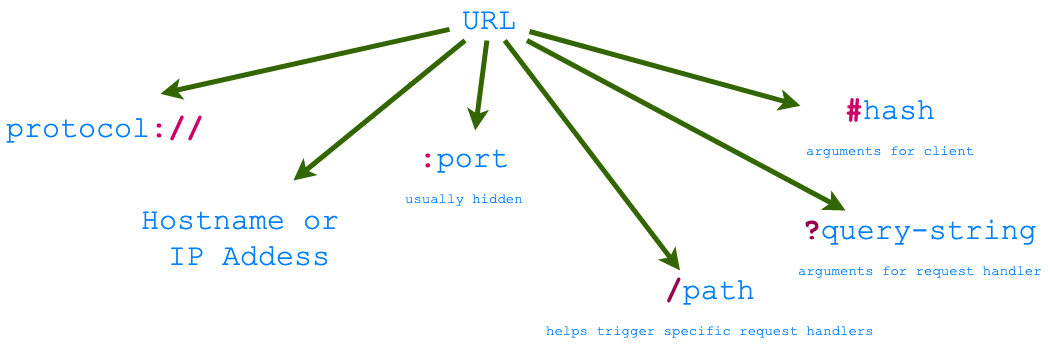
The URL encodes request data that the client sends to a server.
The client addresses the server and embeds all other parameters of
the request in a URL. The Figures below shows an example of a URL, and
components that make up a URL.
Fig: 1.4.1 URL example Fig: 1.4.2 Parts of a URL
The URL provides the following basic information in order to route the
request to the right server:
Protocol scheme (http or https in case of websites/apps).
IP address (or DNS name which resolves to an IP address), which is
unique to every computer including servers.
Port. This allows request to be sent to different server programs on
the same computer. Hidden in case of http/https and defaults to
80/443.
Path, invoking the right request handler in the server.
A query string that provides arguments to the request handler in
key-value pairs.
Routing these request correctly is what
makes youtube.com respond with the video. Depending on the video ID
(argument v) a
different video is served. A playlist is displayed if a valid list
argument is present. Try opeing the following 2 urls:
This section covers the basic skills needed to follow along the
examples in this guide. If unfamiliar using the command line the section
on Bash will introduce you to the BASH shell. This shell is available on
all major operating systems -- Linux, Mac OS and Windows, via git-bash.
Once we have some familiarity with the command line, we will learn to
use GIT for managing our code. The chapter ends with a discussion on
code editors and how to deploy code on remote machines.
Bash is available by default on Mac and Linux and can be access via
git-bash (installed when git is installed) on Windows. Bash is a
"command line interpreter" meaning that it awaits your commands, usually
one line at a time and executes them.
You know you are in a bash shell if you see a dollar ($) prompt with a
blinking cursor awaiting your command.
Once you are at the bash prompt, you can find out who you are by typing
$ whoami
This will print your username.
Next we can find out where in the filesystem we are by typing
$ pwd
This will print the present working directory (within file
system).
Here are some other basic commands to try out
$ ls
List the contents of the present working directory. You can also
$ls -a : lists all files including hidden ones.
$ls -l : list files with details
$ cd <directory path>
Change directory. If no directory name is specified then
present working directory is set to your $HOME.
$ cat <filename>
Prints the content of file <filename>.
ps, jobs : list the processes you are running; every process has a unique integer id number (PID)
top : see what processes are using the most CPU/memory, and show system memory/CPU stats
kill : terminate a process
killall : terminate a group of processes by name
^C: (hotkey) terminates (kills) the currently running process
^Z : (hotkey) suspends the currently running process
& : (special character) when & is placed at the end of a command, that command is run in the background (shell does not wait for the command to finish before returning to the input prompt)
Node.js is a JavaScript Interpreter. In fact it is the same Interpreter
found in Chrome (V8). Node.js however is used to
write servers and desktop (command line) software.
Install using the installer. On Mac OS if you are blocked (unidentified
developer etc.) Go to System Preferences -> Security & Privacy ->
General and click on the button Open Anyway.
Once the installation is complete you can use Node.js in Bash. Type:
http-server is a command line server tool. It can turn any folder into
a static http-server. Once executed it prints out the URL where your
files can be accessed over http.
To install
$ npm install http-server
To use
$ http-server <folder_path>
If no folder is specified then the pwd will be used.
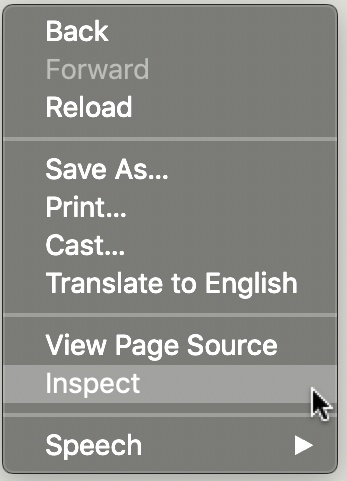
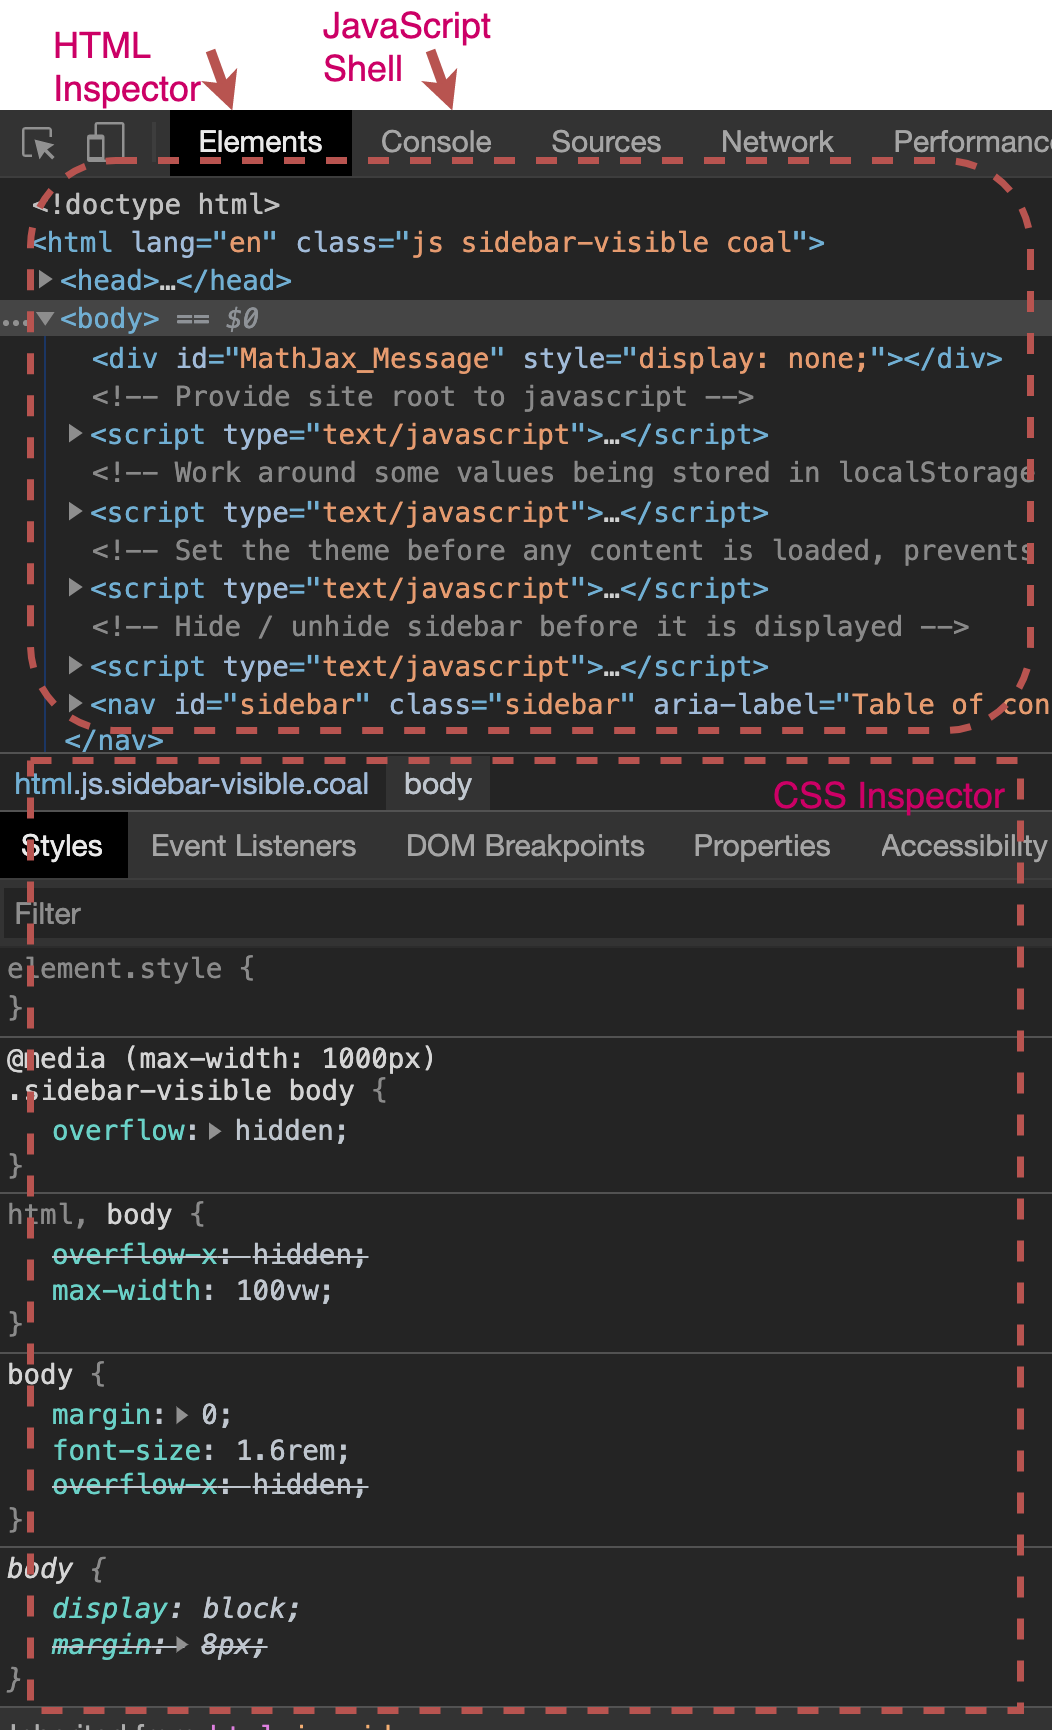
In order to bring up the development tools, right-click anywhere on the
html document. You should be able to choose inspect from the
context menu that appears.
Fig: 2.1.1.1. Trigger inspector for contect menu
(right-click) Fig: 2.1.1.2. Developer Tools
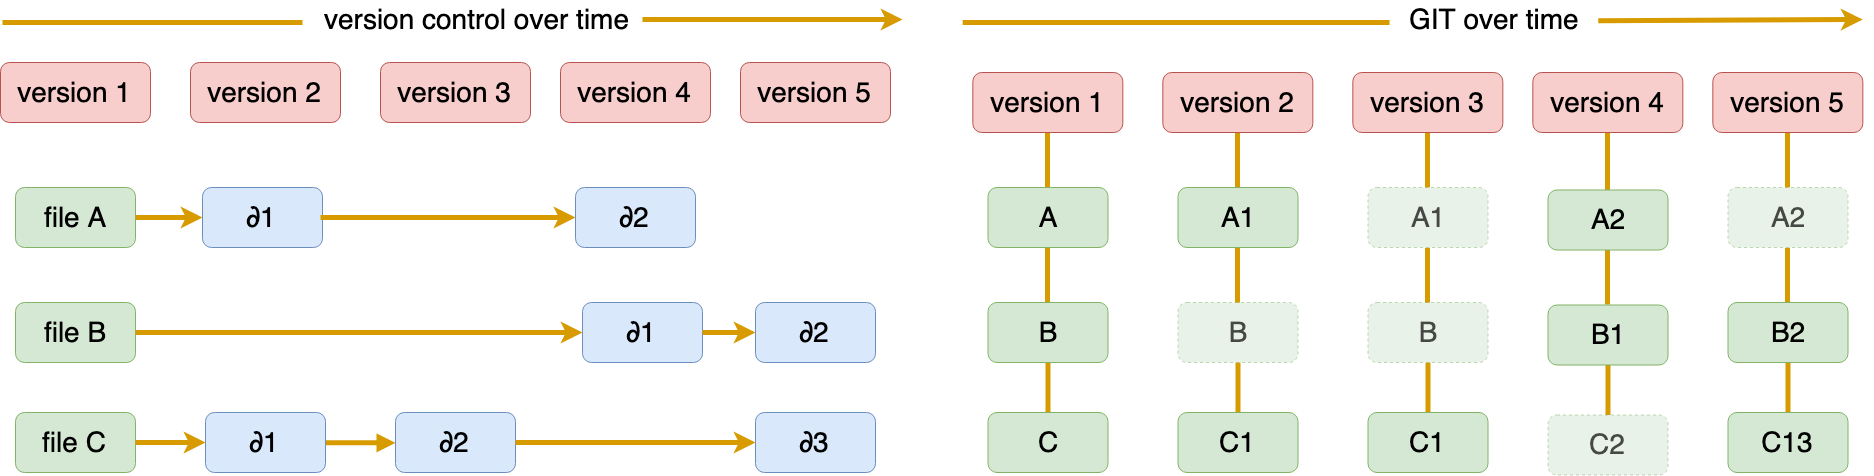
The git lifecycle includes creating versions ("commits") of your development folder as and when it changes. You will
"add" files to be "tracked" in your folder by the git add command. You stage the added files for a "commit" (version) by using the git commit. If your repository is maintained on the cloud, you will need git push to sync the new version created with your cloud (remote) repository.
Fig: 2.4.2. GIT Lifecycle
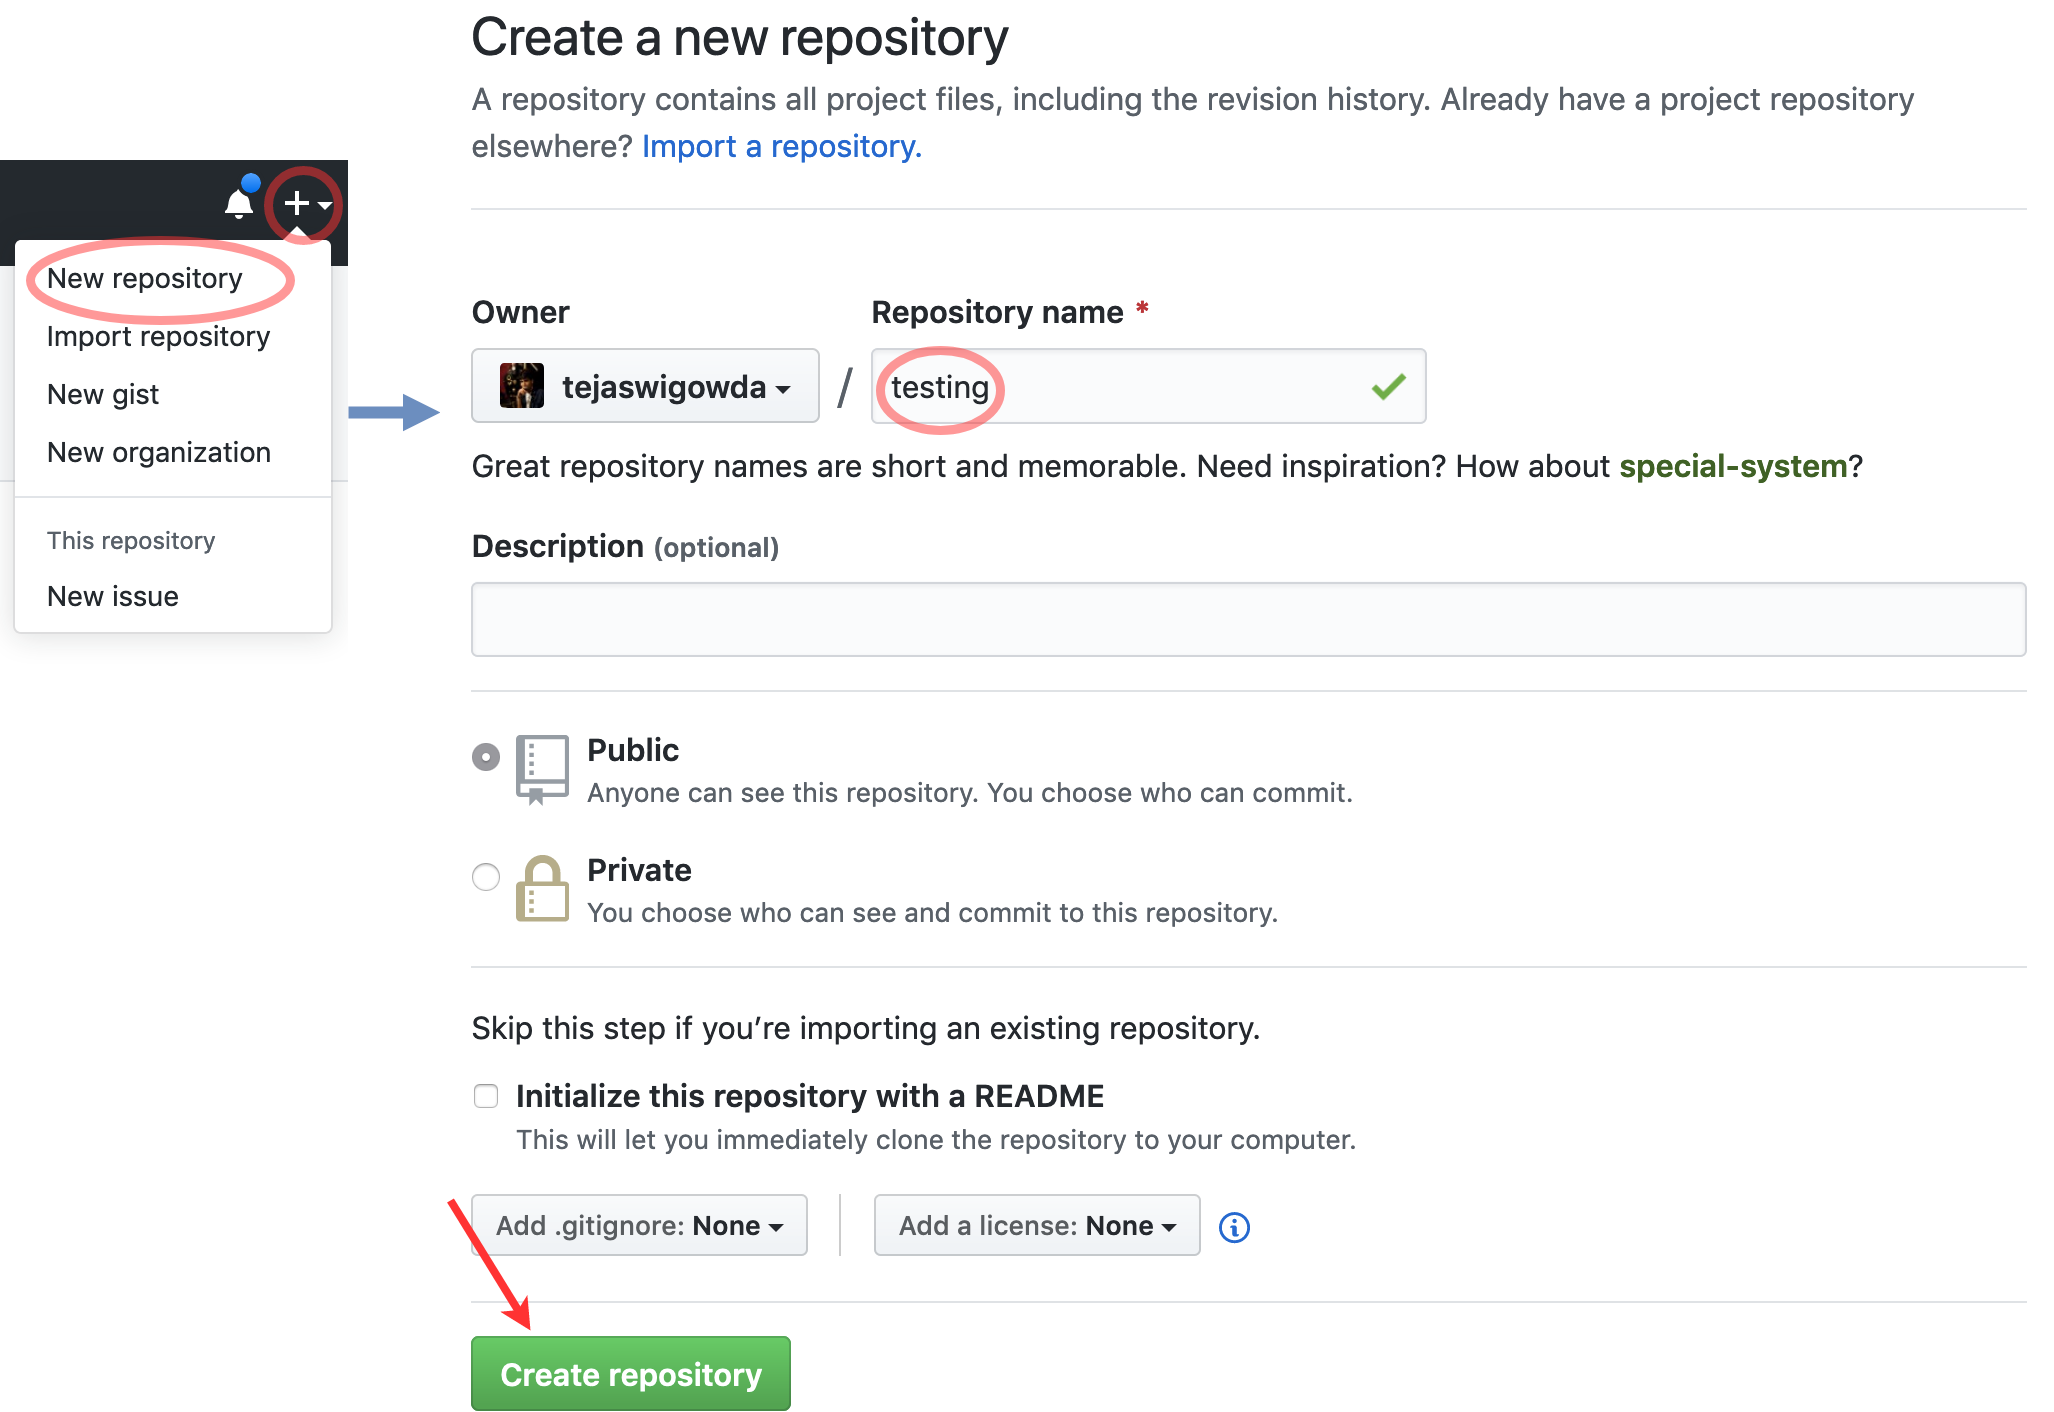
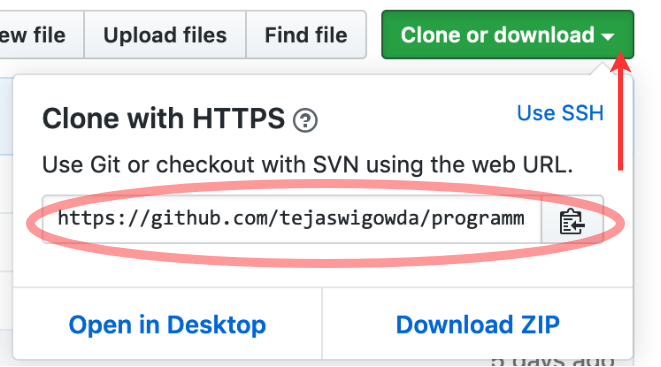
You can create a remote repository by hosting your own git server, or
use Git-as-a-Service(GaaS) providers like GitHub,
GitLab, Bitbucket etc.
The following tutorial uses Github as GaaS, but the command-line steps should work the same with any GaaS.
The examples in this guide will need you to edit code/document format
files (HTML, CSS, JS, C++ etc.). You can use any editor you are
comfortable with. It is recommended that you use an editor with syntax
highlighting.
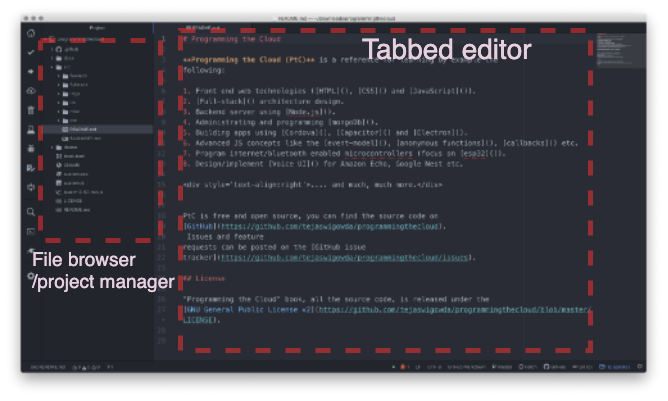
The first 4 are visual editors with a
simple to use, with a user-friendly GUI. VI and EMACS on the other hand
are command-line (Bash) editors. These will come in handy when you need
to edit on a remote machine. However both have steep learning curves and
will take practice to perfect. If you are new to programming this guide
suggests you start with Atom Editor (first choice in the above list). It
has a tabbed editor and a project manager pane (Figure 2.5.1). You can easily add new
files, manage folders and edit/modify/save individual files.
Some of the code examples (usually server or db management) need to be
deployed on a remote machine provisioned by you (you can provision such
machines using IaaSs like Amazon Web
Services, Google Cloud
Compute, Ali
Yun, Microsoft Azure and others).
When you provision a Linux machine on these remote servers you only have
shell access via SSH. In such circumstances use a cloud git repository
to transfer your development code to the remote server. The figure below
sketches this workflow.
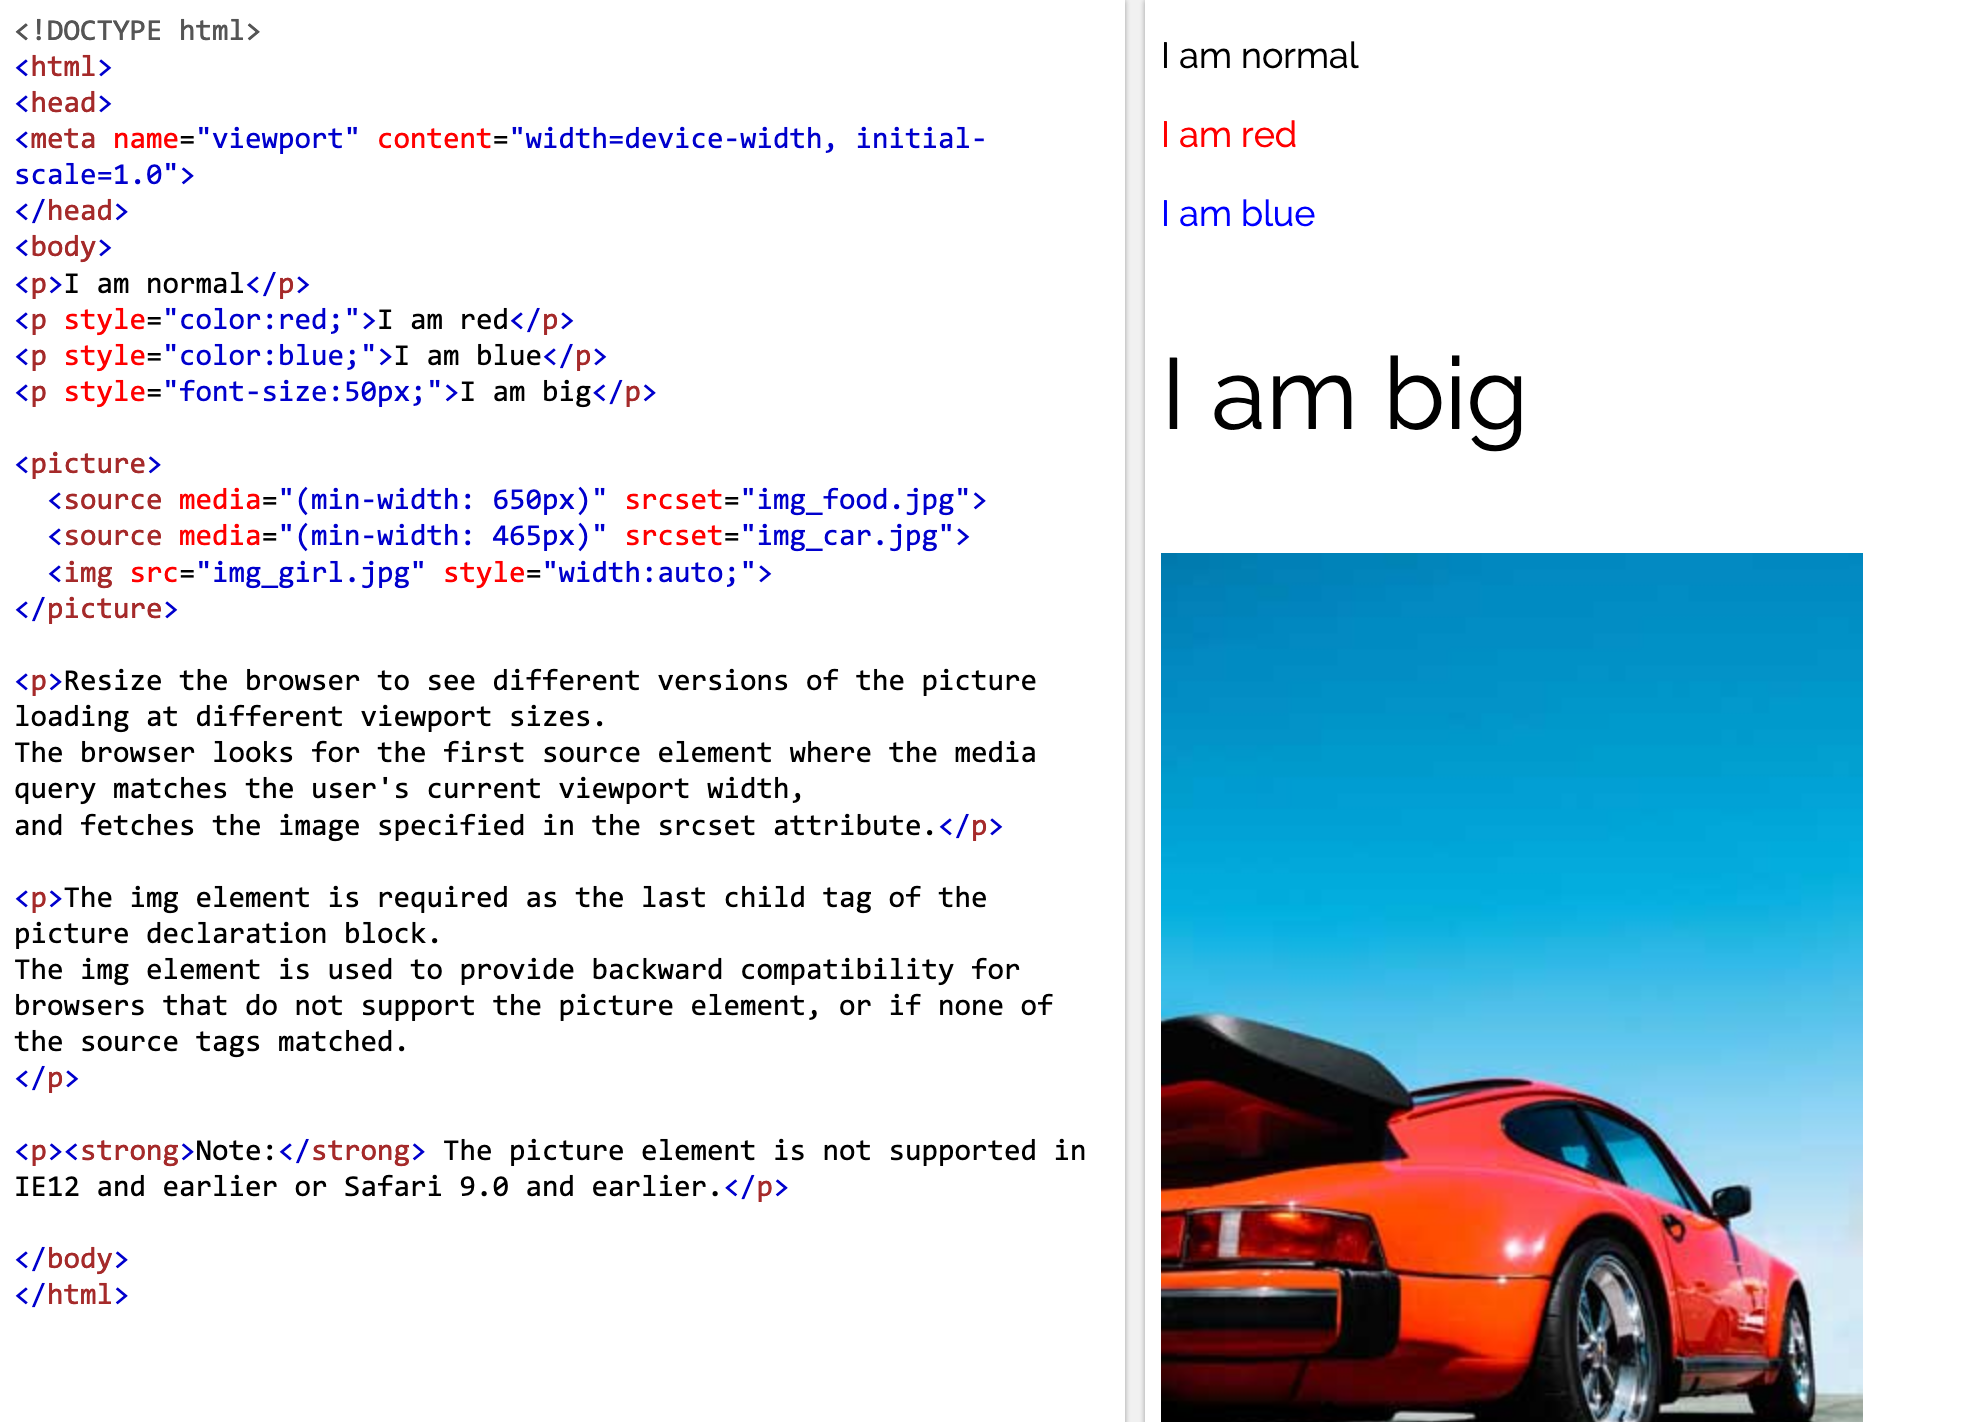
Hypertext markup language (HTML) is the lingua franca of the World Wide
Web (www). It is also a medium for designing websites and apps. It is
however NOT a programming language. Then what is HTML? IT is a
document format much like pdf. You can create documents using
HTML, style them using CSS (a sub-set of HTML). But such pages will lack
interaction (like a pdf document). Interactivity can be added by adding
JavaScript to HTML. More on this later.
HTML can be rendered by Browsers like Chrome, Firefox and Safari. In
order to edit html files however we will need a text editor (see Figure
below). It is
convenient to use code editors for this purpose as they provide syntax
highlighting, autocomplete, lint and other tools.
Fig: 2.1.1. HTML Source and Output
There are 2 main concepts in HTML Tags and
Attributes.
Tags are used to mark up content; this is where "markup
language" in HTML's acronym comes from. HTML is only one of the many
markup languages, and definitely the most popular one. In recent years a
new open standard for HTML is being created. This is called HTML5.
Everything discussed in here is current with this latest version of
HTML.
A HTML tag has 3 parts
Start of Tag, written with the tag name within angle brackets
Content -- any valid html
End of Tag -- similar to start but the tag name has a forward slash
(/) prefix.
<TAG_NAME>

      content

</TAG_NAME>
Let us start by writing out first HTML.
<!doctype html>

<html>
<head>
  <title> Hello World </title>
</head>
</body>
  <h1> Hello World </h1>
</body>
</html>
The first line in every html document is the <doctype> tag. This tag is
stand alone (i.e. does not need to closed as it does not have content).
It is meta data to the browser that the file is an HTML file (browsers
rely on the file extension and also the <doctype> tag to determine if
valid html was served. However most browsers are forgiving if you forget
the <doctype> tag.
Copy the above code and paste it into a new file (use atom if you don't
have a favorite code editor). Save the file as index.html. Serve this
file using http-server and open the URL in
a browser. Notice the title of the browser tab -- it was what we
set (Hello World) as the content of the title tag. Try changing it
and see it change in the browser.
The HTML <html> element represents the root (top-level element) of an HTML document, so it is also referred to as the root element. All other elements must be descendants of this element.
Document metadata
Metadata contains information about the page. This includes information about styles, scripts and data to help software (search engines, browsers, etc.) use and render the page. Metadata for styles and scripts may be defined in the page or link to another file that has the information.
The HTML External Resource Link element (<link>) specifies relationships between the current document and an external resource. This element is most commonly used to link to stylesheets, but is also used to establish site icons (both "favicon" style icons and icons for the home screen and apps on mobile devices) among other things.
The HTML <body> Element represents the content of an HTML document. There can be only one <body> element in a document.
Content sectioning
Content sectioning elements allow you to organize the document content into logical pieces. Use the sectioning elements to create a broad outline for your page content, including header and footer navigation, and heading elements to identify sections of content.
The HTML <article> element represents a self-contained composition in a document, page, application, or site, which is intended to be independently distributable or reusable (e.g., in syndication).
The HTML <footer> element represents a footer for its nearest sectioning content or sectioning root element. A footer typically contains information about the author of the section, copyright data or links to related documents.
The HTML <header> element represents introductory content, typically a group of introductory or navigational aids. It may contain some heading elements but also a logo, a search form, an author name, and other elements.
The HTML <main> element represents the dominant content of the <body> of a document. The main content area consists of content that is directly related to or expands upon the central topic of a document, or the central functionality of an application.
The HTML <nav> element represents a section of a page whose purpose is to provide navigation links, either within the current document or to other documents. Common examples of navigation sections are menus, tables of contents, and indexes.
The HTML <section> element represents a standalone section — which doesn't have a more specific semantic element to represent it — contained within an HTML document.
Text content
Use HTML text content elements to organize blocks or sections of content placed between the opening <body> and closing </body> tags.
The HTML <blockquote> Element (or HTML Block Quotation Element) indicates that the enclosed text is an extended quotation. Usually, this is rendered visually by indentation (see Notes for how to change it). A URL for the source of the quotation may be given using the cite attribute, while a text representation of the source can be given using the <cite> element.
The HTML <dl>element represents a description list. The element encloses a list of groups of terms (specified using the <dt> element) and descriptions (provided by <dd> elements). Common uses for this element are to implement a glossary or to display metadata (a list of key-value pairs).
The HTML <figure> (Figure With Optional Caption) element represents self-contained content, potentially with an optional caption, which is specified using the (<figcaption>) element.
The HTML <hr> element represents a thematic break between paragraph-level elements: for example, a change of scene in a story, or a shift of topic within a section.
The HTML <main> element represents the dominant content of the <body> of a document. The main content area consists of content that is directly related to or expands upon the central topic of a document, or the central functionality of an application.
The HTML <a> element (or anchor element), with its href attribute, creates a hyperlink to web pages, files, email addresses, locations in the same page, or anything else a URL can address.
The HTML Abbreviation element (<abbr>) represents an abbreviation or acronym; the optional title attribute can provide an expansion or description for the abbreviation.
The HTML Bring Attention To element (<b>) is used to draw the reader's attention to the element's contents, which are not otherwise granted special importance.
The HTML Bidirectional Isolate element (<bdi>) tells the browser's bidirectional algorithm to treat the text it contains in isolation from its surrounding text.
The HTML Bidirectional Text Override element (<bdo>) overrides the current directionality of text, so that the text within is rendered in a different direction.
The HTML <br> element produces a line break in text (carriage-return). It is useful for writing a poem or an address, where the division of lines is significant.
The HTML <data> element links a given content with a machine-readable translation. If the content is time- or date-related, the <time> element must be used.
The HTML <em> element marks text that has stress emphasis. The <em> element can be nested, with each level of nesting indicating a greater degree of emphasis.
The HTML Keyboard Input element (<kbd>) represents a span of inline text denoting textual user input from a keyboard, voice input, or any other text entry device.
The HTML Mark Text element (<mark>) represents text which is marked or highlighted for reference or notation purposes, due to the marked passage's relevance or importance in the enclosing context.
The HTML <q> element indicates that the enclosed text is a short inline quotation. Most modern browsers implement this by surrounding the text in quotation marks.
The HTML Ruby Fallback Parenthesis (<rp>) element is used to provide fall-back parentheses for browsers that do not support display of ruby annotations using the <ruby> element.
The HTML Ruby Text (<rt>) element specifies the ruby text component of a ruby annotation, which is used to provide pronunciation, translation, or transliteration information for East Asian typography. The <rt> element must always be contained within a <ruby> element.
The HTML Ruby Text Container (<rtc>) element embraces semantic annotations of characters presented in a ruby of <rb> elements used inside of <ruby> element. <rb> elements can have both pronunciation (<rt>) and semantic (<rtc>) annotations.
The HTML <s> element renders text with a strikethrough, or a line through it. Use the <s> element to represent things that are no longer relevant or no longer accurate. However, <s> is not appropriate when indicating document edits; for that, use the <del> and <ins> elements, as appropriate.
The HTML <small>element represents side-comments and small print, like copyright and legal text, independent of its styled presentation. By default, it renders text within it one font-size smaller, such as from small to x-small.
The HTML <span> element is a generic inline container for phrasing content, which does not inherently represent anything. It can be used to group elements for styling purposes (using the class or id attributes), or because they share attribute values, such as lang.
The HTML Strong Importance Element (<strong>) indicates that its contents have strong importance, seriousness, or urgency. Browsers typically render the contents in bold type.
The HTML Unarticulated Annotation Element (<u>) represents a span of inline text which should be rendered in a way that indicates that it has a non-textual annotation.
The HTML <wbr> element represents a word break opportunity—a position within text where the browser may optionally break a line, though its line-breaking rules would not otherwise create a break at that location.
Image and multimedia
HTML supports various multimedia resources such as images, audio, and video.
The HTML <area> element defines a hot-spot region on an image, and optionally associates it with a hypertext link. This element is used only within a <map> element.
The HTML <audio> element is used to embed sound content in documents. It may contain one or more audio sources, represented using the src attribute or the <source> element: the browser will choose the most suitable one. It can also be the destination for streamed media, using a MediaStream.
The HTML <track> element is used as a child of the media elements <audio> and <video>. It lets you specify timed text tracks (or time-based data), for example to automatically handle subtitles. The tracks are formatted in WebVTT format (.vtt files) — Web Video Text Tracks or Timed Text Markup Language (TTML).
The HTML Video element (<video>) embeds a media player which supports video playback into the document. You can use <video> for audio content as well, but the <audio> element may provide a more appropriate user experience.
Embedded content
In addition to regular multimedia content, HTML can include a variety of other content, even if it's not always easy to interact with.
The HTML <embed> element embeds external content at the specified point in the document. This content is provided by an external application or other source of interactive content such as a browser plug-in.
The HTML <object> element represents an external resource, which can be treated as an image, a nested browsing context, or a resource to be handled by a plugin.
The HTML <picture> element contains zero or more <source> elements and one <img> element to offer alternative versions of an image for different display/device scenarios.
The HTML <source> element specifies multiple media resources for the <picture>, the <audio> element, or the <video> element.
Scripting
In order to create dynamic content and Web applications, HTML supports the use of scripting languages, most prominently JavaScript. Certain elements support this capability.
The HTML <noscript> element defines a section of HTML to be inserted if a script type on the page is unsupported or if scripting is currently turned off in the browser.
The HTML <col> element defines a column within a table and is used for defining common semantics on all common cells. It is generally found within a <colgroup> element.
The HTML <table> element represents tabular data — that is, information presented in a two-dimensional table comprised of rows and columns of cells containing data.
The HTML <th> element defines a cell as header of a group of table cells. The exact nature of this group is defined by the scope and headers attributes.
The HTML <tr> element defines a row of cells in a table. The row's cells can then be established using a mix of <td> (data cell) and <th> (header cell) elements.
Forms
HTML provides a number of elements which can be used together to create forms which the user can fill out and submit to the Web site or application. There's a great deal of further information about this available in the HTML forms guide.
The HTML <button> element represents a clickable button, which can be used in forms or anywhere in a document that needs simple, standard button functionality.
The HTML <datalist> element contains a set of <option> elements that represent the permissible or recommended options available to choose from within other controls.
The HTML <input> element is used to create interactive controls for web-based forms in order to accept data from the user; a wide variety of types of input data and control widgets are available, depending on the device and user agent.
The HTML <option> element is used to define an item contained in a <select>, an <optgroup>, or a <datalist> element. As such, <option> can represent menu items in popups and other lists of items in an HTML document.
The HTML Output element (<output>) is a container element into which a site or app can inject the results of a calculation or the outcome of a user action.
The HTML <textarea> element represents a multi-line plain-text editing control, useful when you want to allow users to enter a sizeable amount of free-form text, for example a comment on a review or feedback form.
Interactive elements
HTML offers a selection of elements which help to create interactive user interface objects.
The HTML <menu> element represents a group of commands that a user can perform or activate. This includes both list menus, which might appear across the top of a screen, as well as context menus, such as those that might appear underneath a button after it has been clicked.
The HTML <menuitem> element represents a command that a user is able to invoke through a popup menu. This includes context menus, as well as menus that might be attached to a menu button.
The HTML Disclosure Summary element (<summary>) element specifies a summary, caption, or legend for a <details> element's disclosure box.
Web Components
Web Components is an HTML-related technology which makes it possible to, essentially, create and use custom elements as if it were regular HTML. In addition, you can create custom versions of standard HTML elements.
The HTML <content> element—an obsolete part of the Web Components suite of technologies—was used inside of Shadow DOM as an insertion point, and wasn't meant to be used in ordinary HTML.
The HTML <slot> element—part of the Web Components technology suite—is a placeholder inside a web component that you can fill with your own markup, which lets you create separate DOM trees and present them together.
The HTML Content Template (<template>) element is a mechanism for holding HTML that is not to be rendered immediately when a page is loaded but may be instantiated subsequently during runtime using JavaScript.
Obsolete and deprecated elements
Warning: These are old HTML elements which are deprecated and should not be used. You should never use them in new projects, and should replace them in old projects as soon as you can. They are listed here for informational purposes only.
The obsolete HTML Base Font element (<basefont>) sets a default font face, size, and color for the other elements which are descended from its parent element.
The Internet Explorer only HTML Background Sound element (<bgsound>) sets up a sound file to play in the background while the page is used; use <audio> instead.
The obsolete HTML Big Element (<big>) renders the enclosed text at a font size one level larger than the surrounding text (medium becomes large, for example).
The obsolete HTML Center Element (<center>) is a block-level element that displays its block-level or inline contents centered horizontally within its containing element.
The HTML <content> element—an obsolete part of the Web Components suite of technologies—was used inside of Shadow DOM as an insertion point, and wasn't meant to be used in ordinary HTML.
The obsolete HTML Directory element (<dir>) is used as a container for a directory of files and/or folders, potentially with styles and icons applied by the user agent.
<frame> is an HTML element which defines a particular area in which another HTML document can be displayed. A frame should be used within a <frameset>.
The obsolete HTML Image element (<image>) is an obsolete remnant of an ancient version of HTML lost in the mists of time; use the standard <img> element instead.
The HTML <keygen> element exists to facilitate generation of key material, and submission of the public key as part of an HTML form. This mechanism is designed for use with Web-based certificate management systems. It is expected that the <keygen> element will be used in an HTML form along with other information needed to construct a certificate request, and that the result of the process will be a signed certificate.
The HTML Listing Element (<listing>) renders text between the start and end tags without interpreting the HTML in between and using a monospaced font. The HTML 2 standard recommended that lines shouldn't be broken when not greater than 132 characters.
The HTML <marquee> element is used to insert a scrolling area of text. You can control what happens when the text reaches the edges of its content area using its attributes.
The HTML <menuitem> element represents a command that a user is able to invoke through a popup menu. This includes context menus, as well as menus that might be attached to a menu button.
The non-standard, obsolete HTML <nobr> element prevents the text it contains from automatically wrapping across multiple lines, potentially resulting in the user having to scroll horizontally to see the entire width of the text.
The <noembed> element is an obsolete, non-standard way to provide alternative, or "fallback", content for browsers that do not support the <embed> element or do not support the type of embedded content an author wishes to use.
The obsolete HTML No Frames or frame fallback element, <noframes>, provides content to be presented in browsers that don't support (or have disabled support for) the <frame> element.
<spacer> is an obsolete HTML element which allowed insertion of empty spaces on pages. It was devised by Netscape to accomplish the same effect as a single-pixel layout image, which was something web designers used to use to add white spaces to web pages without actually using an image. However, <spacer> no longer supported by any major browser and the same effects can now be achieved using simple CSS.
The HTML Example Element (<xmp>) renders text between the start and end tags without interpreting the HTML in between and using a monospaced font. The HTML2 specification recommended that it should be rendered wide enough to allow 80 characters per line.
Attributes can be applied to HTML tags to change their behavior. An
attribute as 2 parts:
The attribute name
The attribute value
Attributes are specified within the start tag as follows:
ATTR_NAME='ATTR_VAL'
The attribute name cannot have spaces and must be one word (underscore
_
allowed). Attribute value should be quoted (single or double quotes --
this is optional but it is best practice to use quotes) and can
include spaces.
A HTML tag can have any number of attributes (or none at all). The
attribute-value pairs are seperated from each other by a white-space
(one or more spaces).
To modify the behavior of a HTML tag: Conside the anchor <a> tag,
which is used to cross reference HTML pages. The href attribute
specifies the html page to navigate to when clicked.
If you want to maintain the aspect-ratio of the image specify only one
of the two (height/width) attributes.
It is best to use CSS to speicfy these properties, more on this
later.
To add CSS styling to the tag: A special attribute called style
can be use to specify CSS declaration for a tag. This is one of the
many ways CSS can be added to a tag. This will be discussed in detail in
the CSS section.
To identify and group tags: An attribute called id can be used to
assign an unique identifier to a tag. This identifier can be used
only for one tag and a tag can have only one id. A tag can be
categorized into a group by the class attribute. A tag can have more
than one class. These class names are delimted by white spaces.
Events are actions done by the user on a tag like clicking, mouse hover
etc. An event handler is JavaScript that needs to execute when the event
occurs. The following markup will pop up a message (100) when the
button is cliked.
<button onclick="alert(100)"> Click me! </button>
The event model will be discussed in more detail in the JavaScript
section.
The next section lists all HTML attributes that can be used with
different html tags.
The following table lists the defined attributes of the HTML standard.
A global
attribute can be used with any tag, whereas most attributes have
certain tags with which they are most commonly used.
Attribute Name
Description
accept
List of types the server accepts, typically a file type.
accept-charset
List of supported charsets.
accesskey
Keyboard shortcut to activate or add focus to the element.
action
The URI of a program that processes the information submitted via the form.
align
Specifies the horizontal alignment of the element.
allow
Specifies a feature-policy for the iframe.
alt
Alternative text in case an image can't be displayed.
async
Executes the script asynchronously.
autocapitalize
Sets whether input is automatically capitalized when entered by user
autocomplete
Indicates whether controls in this form can by default have their values automatically completed by the browser.
autofocus
The element should be automatically focused after the page loaded.
autoplay
The audio or video should play as soon as possible.
background
Specifies the URL of an image file.
bgcolor
Background color of the element.
border
The border width.
buffered
Contains the time range of already buffered media.
capture
From the HTML Media Capture The definition of 'media capture' in that specification.spec, specifies a new file can be captured.
challenge
A challenge string that is submitted along with the public key.
charset
Declares the character encoding of the page or script.
checked
Indicates whether the element should be checked on page load.
cite
Contains a URI which points to the source of the quote or change.
class
Often used with CSS to style elements with common properties.
code
Specifies the URL of the applet's class file to be loaded and executed.
codebase
This attribute gives the absolute or relative URL of the directory where applets' .class files referenced by the code attribute are stored.
color
This attribute sets the text color using either a named color or a color specified in the hexadecimal #RRGGBB format.
cols
Defines the number of columns in a textarea.
colspan
The colspan attribute defines the number of columns a cell should span.
content
A value associated with http-equiv or name depending on the context.
contenteditable
Indicates whether the element's content is editable.
contextmenu
Defines the ID of a ><menu> element which will serve as the element's context menu.
controls
Indicates whether the browser should show playback controls to the user.
coords
A set of values specifying the coordinates of the hot-spot region.
crossorigin
How the element handles cross-origin requests
csp
Specifies the Content Security Policy that an embedded document must agree to enforce upon itself.
data
Specifies the URL of the resource.
data-*
Lets you attach custom attributes to an HTML element.
datetime
Indicates the date and time associated with the element.
decoding
Indicates the preferred method to decode the image.
default
Indicates that the track should be enabled unless the user's preferences indicate something different.
defer
Indicates that the script should be executed after the page has been parsed.
dir
Defines the text direction. Allowed values are ltr (Left-To-Right) or rtl (Right-To-Left)
dirname
disabled
Indicates whether the user can interact with the element.
download
Indicates that the hyperlink is to be used for downloading a resource.
draggable
Defines whether the element can be dragged.
dropzone
Indicates that the element accept the dropping of content on it.
enctype
Defines the content type of the form date when the method is POST.
enterkeyhint
The enterkeyhint specifies what action label (or icon) to present for the enter key on virtual keyboards. The attribute can be used with form controls (such as the value of textarea elements), or in elements in an editing host (e.g., using contenteditable attribute).
for
Describes elements which belongs to this one.
form
Indicates the form that is the owner of the element.
formaction
Indicates the action of the element, overriding the action defined in the <form>.
formenctype
If the button/input is a submit button (type="submit"), this attribute sets the encoding type to use during form submission. If this attribute is specified, it overrides the enctype attribute of the button's form owner.
formmethod
If the button/input is a submit button (type="submit"), this attribute sets the submission method to use during form submission (GET, POST, etc.). If this attribute is specified, it overrides the method attribute of the button's form owner.
formnovalidate
If the button/input is a submit button (type="submit"), this boolean attribute specifies that the form is not to be validated when it is submitted. If this attribute is specified, it overrides the novalidate attribute of the button's form owner.
formtarget
If the button/input is a submit button (type="submit"), this attribute specifies the browsing context (for example, tab, window, or inline frame) in which to display the response that is received after submitting the form. If this attribute is specified, it overrides the target attribute of the button's form owner.
headers
IDs of the <th> elements which applies to this element.
height
Specifies the height of elements listed here. For all other elements, use the CSS >height property.
hidden
Prevents rendering of given element, while keeping child elements, e.g. script elements, active.
high
Indicates the lower bound of the upper range.
href
The URL of a linked resource.
hreflang
Specifies the language of the linked resource.
http-equiv
Defines a pragma directive.
icon
Specifies a picture which represents the command.
id
Often used with CSS to style a specific element. The value of this attribute must be unique.
importance
Indicates the relative fetch priority for the resource.
integrity
Specifies a Subresource Integrity value that allows browsers to verify what they fetch.
intrinsicsize
This attribute tells the browser to ignore the actual intrinsic size of the image and pretend it’s the size specified in the attribute.
inputmode
Provides a hint as to the type of data that might be entered by the user while editing the element or its contents. The attribute can be used with form controls (such as the value of textarea elements), or in elements in an editing host (e.g., using contenteditable attribute).
ismap
Indicates that the image is part of a server-side image map.
itemprop
keytype
Specifies the type of key generated.
kind
Specifies the kind of text track.
label
Specifies a user-readable title of the element.
lang
Defines the language used in the element.
language
Defines the script language used in the element.
loading
Indicates if the element should be loaded lazily (loading="lazy") or loaded immediately (loading="eager").
list
Identifies a list of pre-defined options to suggest to the user.
loop
Indicates whether the media should start playing from the start when it's finished.
low
Indicates the upper bound of the lower range.
manifest
Specifies the URL of the document's cache manifest.
max
Indicates the maximum value allowed.
maxlength
Defines the maximum number of characters allowed in the element.
minlength
Defines the minimum number of characters allowed in the element.
media
Specifies a hint of the media for which the linked resource was designed.
method
Defines which HTTP method to use when submitting the form. Can be GET (default) or POST.
min
Indicates the minimum value allowed.
multiple
Indicates whether multiple values can be entered in an input of the type email or file.
muted
Indicates whether the audio will be initially silenced on page load.
name
Name of the element. For example used by the server to identify the fields in form submits.
novalidate
This attribute indicates that the form shouldn't be validated when submitted.
open
Indicates whether the details will be shown on page load.
optimum
Indicates the optimal numeric value.
pattern
Defines a regular expression which the element's value will be validated against.
ping
The ping attribute specifies a space-separated list of URLs to be notified if a user follows the hyperlink.
placeholder
Provides a hint to the user of what can be entered in the field.
poster
A URL indicating a poster frame to show until the user plays or seeks.
preload
Indicates whether the whole resource, parts of it or nothing should be preloaded.
radiogroup
readonly
Indicates whether the element can be edited.
referrerpolicy
Specifies which referrer is sent when fetching the resource.
rel
Specifies the relationship of the target object to the link object.
required
Indicates whether this element is required to fill out or not.
reversed
Indicates whether the list should be displayed in a descending order instead of a ascending.
rows
Defines the number of rows in a text area.
rowspan
Defines the number of rows a table cell should span over.
sandbox
Stops a document loaded in an iframe from using certain features (such as submitting forms or opening new windows).
scope
Defines the cells that the header test (defined in the th element) relates to.
scoped
selected
Defines a value which will be selected on page load.
shape
size
Defines the width of the element (in pixels). If the element's type attribute is text or password then it's the number of characters.
sizes
slot
Assigns a slot in a shadow DOM shadow tree to an element.
span
spellcheck
Indicates whether spell checking is allowed for the element.
src
The URL of the embeddable content.
srcdoc
srclang
srcset
One or more responsive image candidates.
start
Defines the first number if other than 1.
step
style
Defines CSS styles which will override styles previously set.
summary
tabindex
Overrides the browser's default tab order and follows the one specified instead.
target
title
Text to be displayed in a tooltip when hovering over the element.
translate
Specify whether an element’s attribute values and the values of
its text.
type
Defines the type of the element.
usemap
value
Defines a default value which will be displayed in the element on page load.
width
Establishes the element's width.
wrap
Indicates whether the text should be wrapped.
Boolean Attributes
Some content attributes (e.g. required, readonly, disabled) are called boolean attributes. If a boolean attribute is present, its value is true, and if it’s absent, its value is false.
HTML5 defines restrictions on the allowed values of boolean attributes: If the attribute is present, its value must either be the empty string (equivalently, the attribute may have an unassigned value), or a value that is an ASCII case-insensitive match for the attribute’s canonical name, with no leading or trailing whitespace. The following examples are valid ways to mark up a boolean attribute:
<divitemscope> This is valid HTML but invalid XML. </div><divitemscope=itemscope> This is also valid HTML but invalid XML. </div><divitemscope=""> This is valid HTML and also valid XML. </div><divitemscope="itemscope"> This is also valid HTML and XML, but perhaps a bit verbose. </div>
To be clear, the values "true" and "false" are not allowed on boolean attributes. To represent a false value, the attribute has to be omitted altogether. This restriction clears up some common misunderstandings: With checked="false" for example, the element’s checked attribute would be interpreted as true because the attribute is present.
HTML tags can be nested and this the HTML document has a tree
structure. The root of this tree is the <html> tag whose child nodes
are <head> and <body>. The document then branches out into different
tags. Most tags can have child nodes, however there are a few exceptions
to this. Certain tags are standalone i.e. they cannot have child
nodes. Examples of such tags are:
<img>
<hr>
<input>
<textarea>
These tags do not need the end tags (like </img>, </hr> etc.) since
they cannot have content (child nodes).
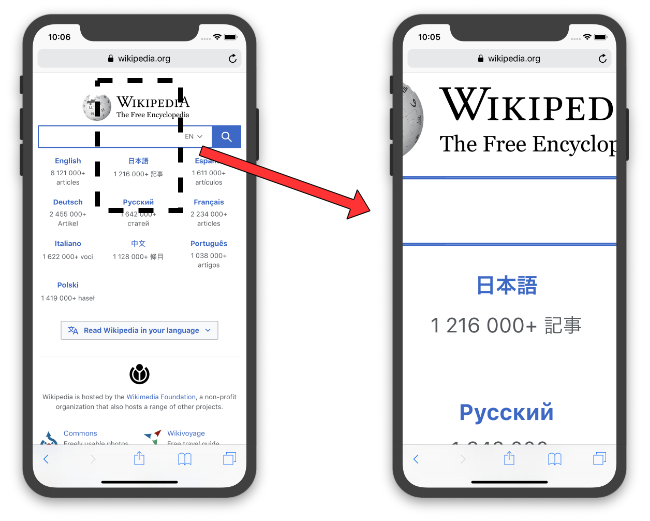
The <body> of the html page renders the window, which is the entire
page. However with the advent of mobile devices the contents of the
window can be panned and zoomed. The content (part of the window) that
is now visible to the user is called the viewport.
Fig: 3.3.1 Window v/s Viewport
In the interest of responsive design it makes sense to make the window and
the viewport the same, so we can proceed with designing for a one
size canvas. This can be done by adding the following <meta> tag
within the <head> of the HTML document.
Although both CSS and JavaScript can be embedded within the HTML
document it is a good practice to use external files for each. These
external files can be linked into the HTML document by using the
<link> and <script> tags as follows:
The contents of the HTML file loads in the order it is writen
right-to-left and top-to-bottom. This concept becomes important when
styles (in CSS) and variables (in JavaScript) are redefined.
To publish a HTML file/project on the web, Github Pages is the free
option. Although it does not provide server side processing for your
project, you can still host a variety of useful projects.
All you need to do is go to Settings -> Github Pages section and choose
your option to publish the repository.
Pleae create a index.html as a start page for your project.
CSS provides a way to style HTML tags. CSS was developed to make html
'clean'; that is to separate styles from tags. There are 3 important
concepts in CSS:
Properties
Values
Selectors
The easiest way to add CSS to an html tag is via the style attribute.
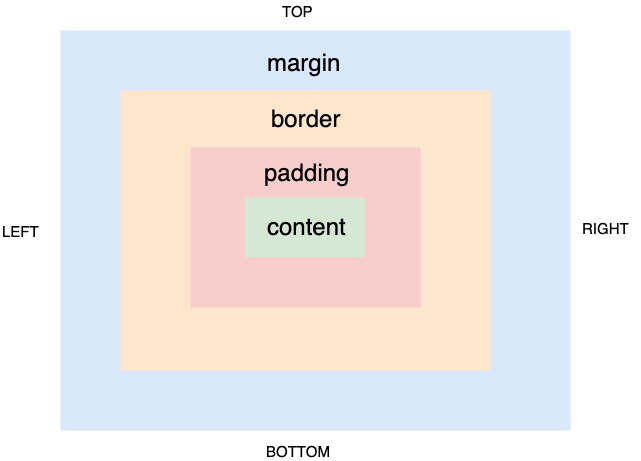
CSS properties are a list of tag style elements that you can set and
manipulate. These include setting the parameters of the box model (like
border, margin, padding) and the style of the content like
color, background,
font-family, font-size, line-height etc.
The browser has a built-in stylesheet that it loads. This style sheet is
responsible for the basic styling you see in the browser (for e.g. links
are bule and button has a background and border). When stying your
document please keep in mind that you are not working with a blank-slate
-- you are building on top of the user-agent style sheet. This can be
viewed in the CSS Inspector section of the browser's developer
tools.
If CSS does not understand a property or value, it moves on to the next
pair. A faulty property-value pair cannot make the entire CSS style
sheet invalid. This behavior of CSS is know as graceful fallback.
left top
left center
left bottom
right top
right center
right bottom
center top
center center
center bottom
If you only specify one keyword, the other value will be "center"
x% y%
The first value is the horizontal position and the second
value is the vertical. The top left corner is 0% 0%.
The right bottom corner is 100% 100%. If you only specify one
value, the other value will be 50%. . Default value is: 0% 0%
<CSS declaration 1> will be applied to all tags that have a class first and <CSS declaration 2> will be applied to all tags with the class name second.
When selectors are combined with a space in-between it is interpreted as
decendent of elements (from left-to-right):
Example:
div #first .second{
  <CSS declaration>
}
This <CSS declaration> will be applied to a tag that has a class
second, which is a decendent of a tag which has [id='first'], which
in itself is a decendent of a <div> tag. Note that these tags only
have to be decendent nodes and not strictly child nodes.
An HTML page is read top-down and hence any CSS included (whether using
<link>, <style> tag or style attribute is also read in that order.
If properties are redefined, then the values are cascaded, i.e the
last encountered value is the one applied.
jQuery is known as the syntactic-sugar for JavaScript. This means you
can write valid JavaScript without having to learn the full syntax of
JavaScript. jQuery is a JS library and hence all jQuery written is JS,
but not the other way around.
jQuery implements the dollar function. The argument to this function
can be any valid CSS selector. This makes using jQuery intuitive for
designers who are familiar with CSS.
The $() function in itself is not very useful. After selecting a group
of tags (using CSS selectors), we need to do something with these tags.
jQuery provides a variety of functions that do something with those
tags.
While chaining functions delay() (adds delay to the queue of
transitions/animations) and stop() (which empties the
transition/animation queue) are very useful.
JavaScript is an Object-Oriented programming language that preserves
C-like syntax. As the name implies it is a scripting language and is
hence interpreted (as opposed to compiled). A JS Interpreter is a
program that reads valid JS and executes it one statement at a time
(line-by-line).
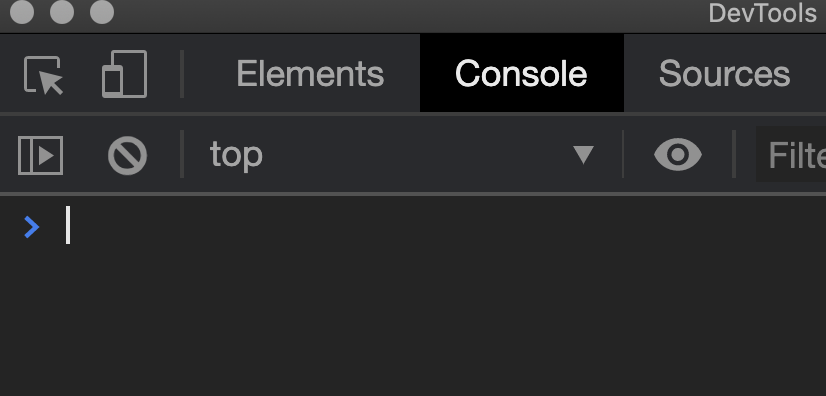
JS Intepreters can be stand alone or can be packaged within other
programs like browsers and database shells. This interpreter can be accessed via the
console. In a browser this console can be accessed via
Developer Tools.
All JS within the HTML page is interpreted on this console. The console
understands all valid JS. To try out the console type any arithmetic
expression (say 1+3) and the console should return the write answer
back.
In the next few sections we will learn about JS syntax, data types, objects,
functions and other concepts.
A JS program is a list of JS statements. Each statement is interpreted
on the console one at a time.
Each statement is delimited from another by either a semicolon (;) or
a newline.
A Javascript program is read top-to-bottom, left-to-right. This is known
as the execution sequence. Programming involves manipulating the
execution sequence in order to achieve specific computational tasks.
Keywords: Keywords are special words that provide commands to the
interpreter. Keywords cannot be overloaded (i.e. used as variable
names).
The following is the list of JS keywords (an incomplete list; new keywords are added to JS
on a regular basis):
break, case, catch, continue, debugger, default,
delete, do, else, finally, for, function, if,
in, instanceof, new, return, switch, this, throw,
try, typeof, var, void, while, with
This is not a complete list as JS continues to evolve and new keywords can be added.
Values: Values can either be fixed or variable. Fixed values are
called literals and variable values are called variables.
Example of literals include constants like 1, 100, 3.142 etc.
Variables are subject to the variable lifecycle that includes (in that
order) -- declaration, definition and usage.
A variable is declared in a JS statement by using the var keyword.
For e.g.:
var x;
Multiple variables can also be declared in one statement:
var x,y,z;
These statements serve the purpose of "declaring" these variables to the
interpreter. JS does not require a declaration statement, but it is best
practice to use these declarative statements, to ensure readability and
ease of debugging.
The next stage in the lifecycle of a variable is definition. A
variable is defined using the assignment (=) operator. For example:
x = 10;
y = "test string"
Once a variable is defined (it is undefined by default) it can be used
as a placeholder for value. e.g.:
z = x + y;
Operators: Operators are special characters (similar to
mathematical operators) that specify a particular operation to the
interpreter. The following is the list of basic operators:
Operator
Description
=
Assignment
+
Addition
-
Subtraction
*
Multiplication
**
Exponentiation
/
Division
%
Modulus (Division Remainder)
Table: 6.1.1 Binary Operators
Operators can be classified (based on the number of operands) as:
Unary Operators: These operators take in one operand as input. Some examples
are:
Operator
Description
++
Increment
--
Decrement
Table: 6.1.2 Unary Operators
Binary Operators: Binary operators require 2 operands. All
standard examples mentioned before (Table 6.1.1) are binary operators. The following
as some special binary assignment operators:
Operator
Example
Same As
=
x = y
x = y
+=
x += y
x = x + y
-=
x -= y
x = x - y
*=
x *= y
x = x * y
/=
x /= y
x = x / y
%=
x %= y
x = x % y
**=
x **= y
x = x ** y
Table: 6.1.3 Binary Assignment Operators
Ternary Operators:
JavaScript supports one ternary operator -- ?:. It can be combined
with an assignment operator to assign different values. For example:
var fee = (age > 18) ? '$12.00' : '$2.00'
The variable fee will be assigned to '$12.00' if age > 18 and will
be assigned a value of '$2.00' otherwise.
Expressions: JS expressions are statements that combine operators
and operands (literals and variables). We have seen examples of this before. Here are more:
x = 6 + 8 + z;
y = a++ * 10;
Comments: JavaScript supports both single-line and multi-line
comments. Single line comments begin with a // and are delimited by
the end of line. Multiple line comments start with /* and end with
*/.
// This is a single line comment

/*
This is
a multi-line
comment
*/
JS variable does not have to be single characters like x, y, z
etc. But can be anything as long as the following rules are followed:
The variable name can contain numbers, alphabets (alpha-numeric),
underscore(_) and dollar sign ($).
The first character of a variable has to be an alphabet,
underscore(_) or dollar sign($).
Variables canot be a JS reserved keyword.
Variable names are case sensitive. Therefore age, Age and AGE are
3 distinct variables.
Variable names cannot start with numbers.
Variable names cannot contain spaces. Use camel-case or underscores to
ensure readability of multiple word variable names (e.g.: maxValue or
max_value).
There is no length limit on JS variable names (a good rule-of-thumb is
to limit it to 32 characters).
JavaScript variables are loosely typed, that is the data type of a
variable can be changed at anytime. This is an important distinction
from other strongly typed languages such as C, C++ and Java.
Since JS is loosely typed there is only one variable declaration type --
using the var keyword (as opposed to a language like C, which has
int, float, char and other variable types).
Even though there is only one type of variable declaration, JS does have
different data types. Loose typing allows for the same variable (think
of it as a container for values) to be reassigned to different data types.
The typeof operator allows us to inspect the datatype of the
variable.
var x;
typeof x; // undefined

x = 1;
typeof x; // number

x = "a string";
typeof x; // string
String is a built in data-type in all JS interpreters. A String can be
assigned to any variable by the assignment (=) operator. A string
literal can be enclosed with either single or double quotes.
var st = "a string"; // string assignment
var st1 = 'another string'; // string literals can use either single or
double quotes
Each element (character) of the string can be indexed by using its
index, or the position. Remember strings are zero-indexed i.e.
indexing starts with zero. Therfore st[0] refers to the first
character in a string, st[1] refers to the second character and so on.
The total number of characters can be accessed by the length property.
var st = "a string";
var len = st.length; // 8
A string is also an object and has built-in methods. Let is look at a
few of them in action.
var st = "a string";
var x = st.indexOf("s"); // 2

var words = st.split(" "); // [ "a", "string" ]

var aChar = st.charAt(6); // "n"

var charCode = st.charCodeAt(6); // 110
Arrays are another built in data-type that allows the programmer to
manage lists. Unlike strings, which only allows characters to be part of
the list, arrays can have any valid JS value(variable/literal) as members.
Similar to string, the number of list members can be accessed via the
length property.
var arr = ["a", 1, "a string", 3.14];
var len = arr.length; // 4
The Boolean data type contains 2 values true and false;
var x = true;
typeof x // boolean

x = false;
typeof x // boolean
Before continuing with more complex data-types (objects) and functions
we will now look at more operators and programming constructs used in
JavaScript.
The JavaScript execution sequence is one statement at-a-time,
left-to-right (like we would read English). However operators and
certain programming constructs(if/else, for, while etc.) can alter
this. We now look at how operators affect the execution sequence.
The assignment operator has 2 operands, commonly known as the
left-hand-side (var x) and the right-hand-side (2 + 3).
The default execution sequence dicatates that the left-hand-side be
evaluated by the interpreter first. The assignment operator changes
this. It dictates that the right-hand-side is evaluated first. Thus the
expression 2 + 3 is evaluated (5) and then is assigned to the
left-hand-side. That is, the variable declaration and assignment happens
after the right-hand-side expression is evaluated.
All other operators also alter the execution sequence. The interpreter
uses the precedence order to evaluate operators. The following table
lists the precedence of each JS operator.
The same operator can perform different operations depending on the
operands provided to it. This is known as operator polymorphism.
This concept is best explained using the addition(+) operator.
Look at the following examples:
var num = 10;
var st = "hello";

typeof num; // "number"
typeof st; // "string"

var x = num + 20; // 30
typeof x; // "number"

var y = st + "world"; // "hello world"
typeof y; // "string"

var z = num + st; "10hello"
typeof z; // "string"

z = st + num; "hello10"
typeof z; // "string"
A code block is a group of JS statements that are enclosed in between curly braces
({}). Certain code-blocks allow for modification of the execution
sequence in interesting ways -- decision making and iteration.
The if/else construct lends itself to implementing binary decision
trees in JS. An if/else block has the following syntax:
if( <CONDITION> ){
  // execute statements in block
  // if the <CONDITION> is true
}
else{
  // execute statements in block
  // if the <CONDITION> is false
}
The <CONDITION> can be any valid JS expression. Unlike other languages
the <CONDITION> does not have to strictly evaluate to a Boolean true or
false. The Interpreter will typecast the <CONDITION> to the nearest
Boolean value (Either true or false).
Consider the following example where different entry prices apply
depending on age.
This construct allows implementation of decision trees and is best
suited for more than 2 decison options. Consider the following example
of assigning grades:
This list can be iterated using an index variable i and the
while()
loop as follows:
var i = 0; // define an initialize the index variable
// JS arrays are zero-indexed

while(i < values.length){
  console.log(values[i]);
  i++; //equivalent to i = i + 1;
}
This same while loop can be written as a for loop as follows:
for(var i = 0; i < values.length; i++){
  console.log(values[i]);
}
As you can observe the for loop combines the index initialization and
increment together with the conditional.
while and for are equivalent -- anything you can do with while
yiou can do with for and vice-versa.
Now let us look how we can find the minimum and maximum value of an
array using while and for.
// Using while
var values = [3, 13, 14, 234, 12, 4, 13, 54, 64, 76, 65];
var min = Infinity;
var max = 0;
var i = 0;
while(i < values.length){
  if(values[i]>max){
    max = values[i];
  }
  if(values[i]<min){
    min = values[i];
  }
  i++;
}
// Using for
var values = [3, 13, 14, 234, 12, 4, 13, 54, 64, 76, 65];
var min = Infinity;
var max = 0;
for(var i = 0; i < values.length; i++){
  if(values[i]>max){
    max = values[i];
  }
  if(values[i]<min){
    min = values[i];
  }
}
The continue keyword
The continue keyword gets the control (execution sequence) to the end
of the code block.
Let us look at an example on how to use this. In this example we will
calculate the average of a list of values that are positive.
var values = [-1, -5, 35, 43, 234, -67, 76, 64, 34, 77];
var sum = 0;
for (var i = 0; i < values.length; i++){
  if(values[i] < 0){
    continue;
  }
  sum = sum + values[i];
}
var avg = sum/values.length;
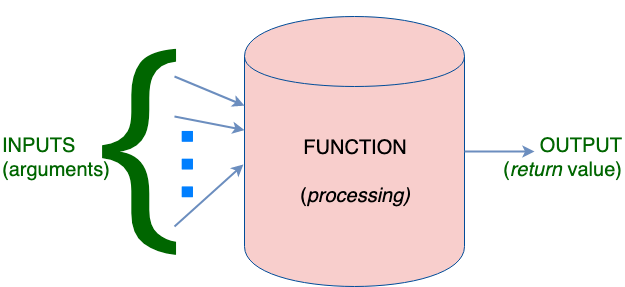
Function in JS allow you to reuse code (easy to copy bits)
again-and-again with differemt inputs(known as arguments).
Depending on the input the function does computation (processing of
statements) and returns an output (known as return value).
Fig: 6.6.1 function() Block Diagram
Syntactically the function is a code block (a list of statements) that
treat input arguments as local variables. It returns an empty
value (when no return statement is found, or there is an empty return
statement) or any JS variable. The return value can be assigned to any JS
variable.
var function = <FUNCTION_NAME>(<ARGUMENTS>){
  /*
    Valid JS statements
    to execute
  */

  return; // return undefinied
}
Sementically the function is just another variable, hence function names
have the same naming restrictions as variables.
Let is consider the following example in which a function converts
temperature from Celcius to Farenheit.
var c2f = function(c)
{
  var f = c * 1.8 + 32;
  return f;
}
This function returns the Farenheit value of input temperature in
Celcius. It can be invoked as follows:
var c = 100;
var f;
f = c2f(c); // 212
f = c2f(56.4); // 133.51999999999998
f = c2f(80.45); // 176.81
In order to preserve C like syntax JS allows for the following function
declaration syntax as well:
function <FUNCTION_NAME>( <ARGUMENTS> ){
  /*
    Valid JS statements
    to execute
  */

  return; // return undefinied
}
This function takes in a String argument (other variables are typecast
to String) and displays it as a pop-up message
for the user. Try these in your browsers JS console:
This function is used to print debug information into the console. On
the browser this can be accessed via Developer Tools. It prints to
console any string given as argument (other data types are typecast).
Objects are a built in data type. An Object is a collection of
properties(variables) and methods(functions), which are called members of the
Object.
We have already looked at 2 built in
objects -- Strings and Arrays. They both have property length and many
different methods.
Object property and methods can be accessed via the dot (.) operator
or through box brackets ([]). For example the string property length
can be accessed as follows:
var s = "a test string";
var len = s.length; // using dot operator
var len = s["length"]; // using box brackets
Similarly any methods (say indexOf()) can be accessed similarly:
var s = "a test string";
var pos = s.indexOf(a); // using dot operator
var pos = s["indexOf"](a); // using box brackets
There is a built-in Object called Object. This has one useful static
method that we will discuss here. Object.keys() returns the list of
all the objects member keys. It is very handy when you want to iterate
the Object.
var keys = Object.keys(location) // can be used to get keys on any object

for(var i = 0; i < keys.length; i++){
  console.log("Key: " +keys[i]);
  console.log("Key value: " + location[keys[i]]);
}
The new keyword is used to create a new object. Notice that we did not
use new() to create Arrays and Strings. That is because they are
built-in objects which can be instantiated without new(although you
could if you choose to).
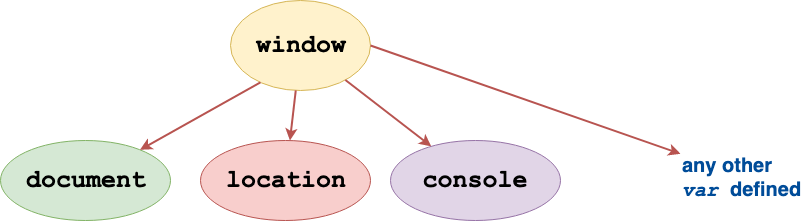
For browser based JS, the window is the topmost object. All other
objects and variables are derived from the window object.
Fig: 6.5.1 window Object
Therefore when we write console.log() it is interpreted as
window.console.log().
The window object encapsulates other important objects such as --
location (which has useful members such as location.href,
location.hash, location.host, location.reload() etc.) and
document.
The Document Object Model (DOM) is the represenation of the HTML document
within JS. The DOM has an object associated with each element (tag) within
the HTML document. The corresponding object can be used to read tag information (query
status of attributes and their values) as well as set
tag attribute values. Thus a DOM provides a way to read attribute values
from tags (including CSS declarations, since style is an attribute)
and set them.
The document Object has important DOM access methods such as
document.getElementById(), document.getElementsByTagName() ,
document.getElementsByClassName() etc
jQuery is a wrapper that implements different functions on top of JS.
The main dollar function ($()) in jQuery internally uses the DOM
(document Object, more specifically the document.querySelectorAll()
function).
The library is implemented in lib.html and the demonstration is in
index.html. Let us take a look at lib.html first:
The static markup for this example is straight-forward (lines 76-87).
It included <div id="imgWrapper"> that will be populated by the slides
and <div id="numWrapper"> that will hold the numbers of the slides.
There are also navigation buttons -- Next (line 85) and Previous (line
80).
The CSS (lines 9-75 styles the slideshow. It makes sure that the
slides are placed one behind another (hidden, except the current
slide); the numbers indicating the number of slides is at the bottom,
and the previous and next arrows are to the left and right of the screen
respectively. Note that jQuery is also included via CDN (line 5).
The JS is triggered after the page loads (since it is after the
<body> tag) and first gets the list of images to be used in the slide
show (line 89).
var imgs = location.hash.replace("#","").split(",")
By iterating over the imgs variable the markup for the numbers at the
bottom are created at attached(lines 90-94).
var markup = "";
for(var i = 0; i < imgs.length; i++){
    markup = markup + "<button onclick='goToSlide(" + i + ")'>" + (i+1) + "</button>"
}
document.getElementById("numWrapper").innerHTML = markup;
Another iteration over the array of image URLs(imgs) creates the
markup for the slide show itself (lines 96-100).
var markup = "";
for(var i = 0; i < imgs.length; i++){
  markup = markup + "<div style='background-image:url(" + imgs[i] + ")'></div>"
}
document.getElementById("imgWrapper").innerHTML = markup;
The variable currSlide keeps track of the index of the current slide
(zero-indexed) (defined in line 102).
var currSlide = 0;
The function triggered by the user (by clicking the numbers on the
bottom is goToSlide(). This is defined
in lines 104-112.
This function is also invoked by the goPrev() (invoked when user
clicks Previous button) and goNext() (invoked when user clicks Next
button). These functions are defined in lines 115-129.
JavaScript Object Notation (JSON) is exactly what the name implies -- it
is representing data as JS Objects. Therefore JSON syntax is identical
to the object syntax.
// JSON Syntax
{
    property_1:   value_1,   // property_# may be an identifier...
    2:            value_2,   // or a number...
    // ...,
    'property n': value_n   // or a string
};
In practice JSON is a file that
holds the string that defines the JS Object.
To make it easy to work
with JSON, JS Intepretors have a build in JSON Object. It has two
important static methods -- JSON.parse() and JSON.stringify() that
allow to parse a JSON String into an Object and vice-versa respectively.
var obj = {
  name: "Jane Doe",
  classes:[ "Programming the Web", "Database Management", "Operating Systems"],
  school: "ABC Academy"
}

var jsonString = JSON.stringify(obj);
  // '{"name":"Jane Doe","classes":["Programming the Web","Database Management","Operating Systems"],"school":"ABC Academy"}'

var objCopy = JSON.parse(jsonString);
JSON is strictly a data-interchange format, and can hold any data-type
with the exception of functions.
With JSON data and JS arrays, dorting based on a particular key becomes
an useful operation. In this section we discuss the basics of sorting by
looking at bubbule sort as a standard sorting algorithm.
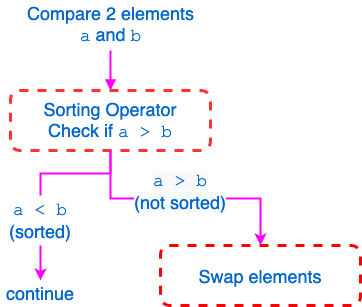
Bubble Sort is a sorting algorithm that sorts the array two members at
a time. The idea of bubble sort is simple -- look at two adjacent
elements in the array; are they sorted?. If already sorted then do
nothing; if unsorted swap the position of the 2 elements.
Fig: 7.2.1 Sorting Logic
How many passes (iterations) of the array is needed? -- no more than
the size of the array. Let us look at sorting an array [6,5,3,1,8,7,2,4]
var arr = [6,5,3,1,8,7,2,4];
for (var i = 0; i < arr.length; i++){
  for (var j = 0; j < arr.length -i; j++){
    if(arr[j]>arr[j+1]){
      var temp = arr[j];
      arr[j] = arr[j+1];
      arr[j+1] = temp;
    }
  }
}

console.log(arr);
Bubble Sort is just one of the many different sorting algorithms. The
similarity between all these is that they all employ the sorting
operator. They differ in only how they traverse and iterate over
arrays. Therefore the key to any sorting is the comparison operator.
Internet of Things (IoT) is an emerging field that focusses on
connecting everyday objects to the Internet. What does it mean to
connect everyday objects to the Internet? It means to implement clients
and servers on low-power, low-cost, small computers (known as
microcontrollers) to control everyday
objects. This section will teach you the basics of programming
clients/servers on ESP32, a production ready IoT platform.
The commercial and industrial applications of IoT are now well
understood and different solutions are being developed. IoT device
adaption is expected to rise over the next couple of decades [Ref.].
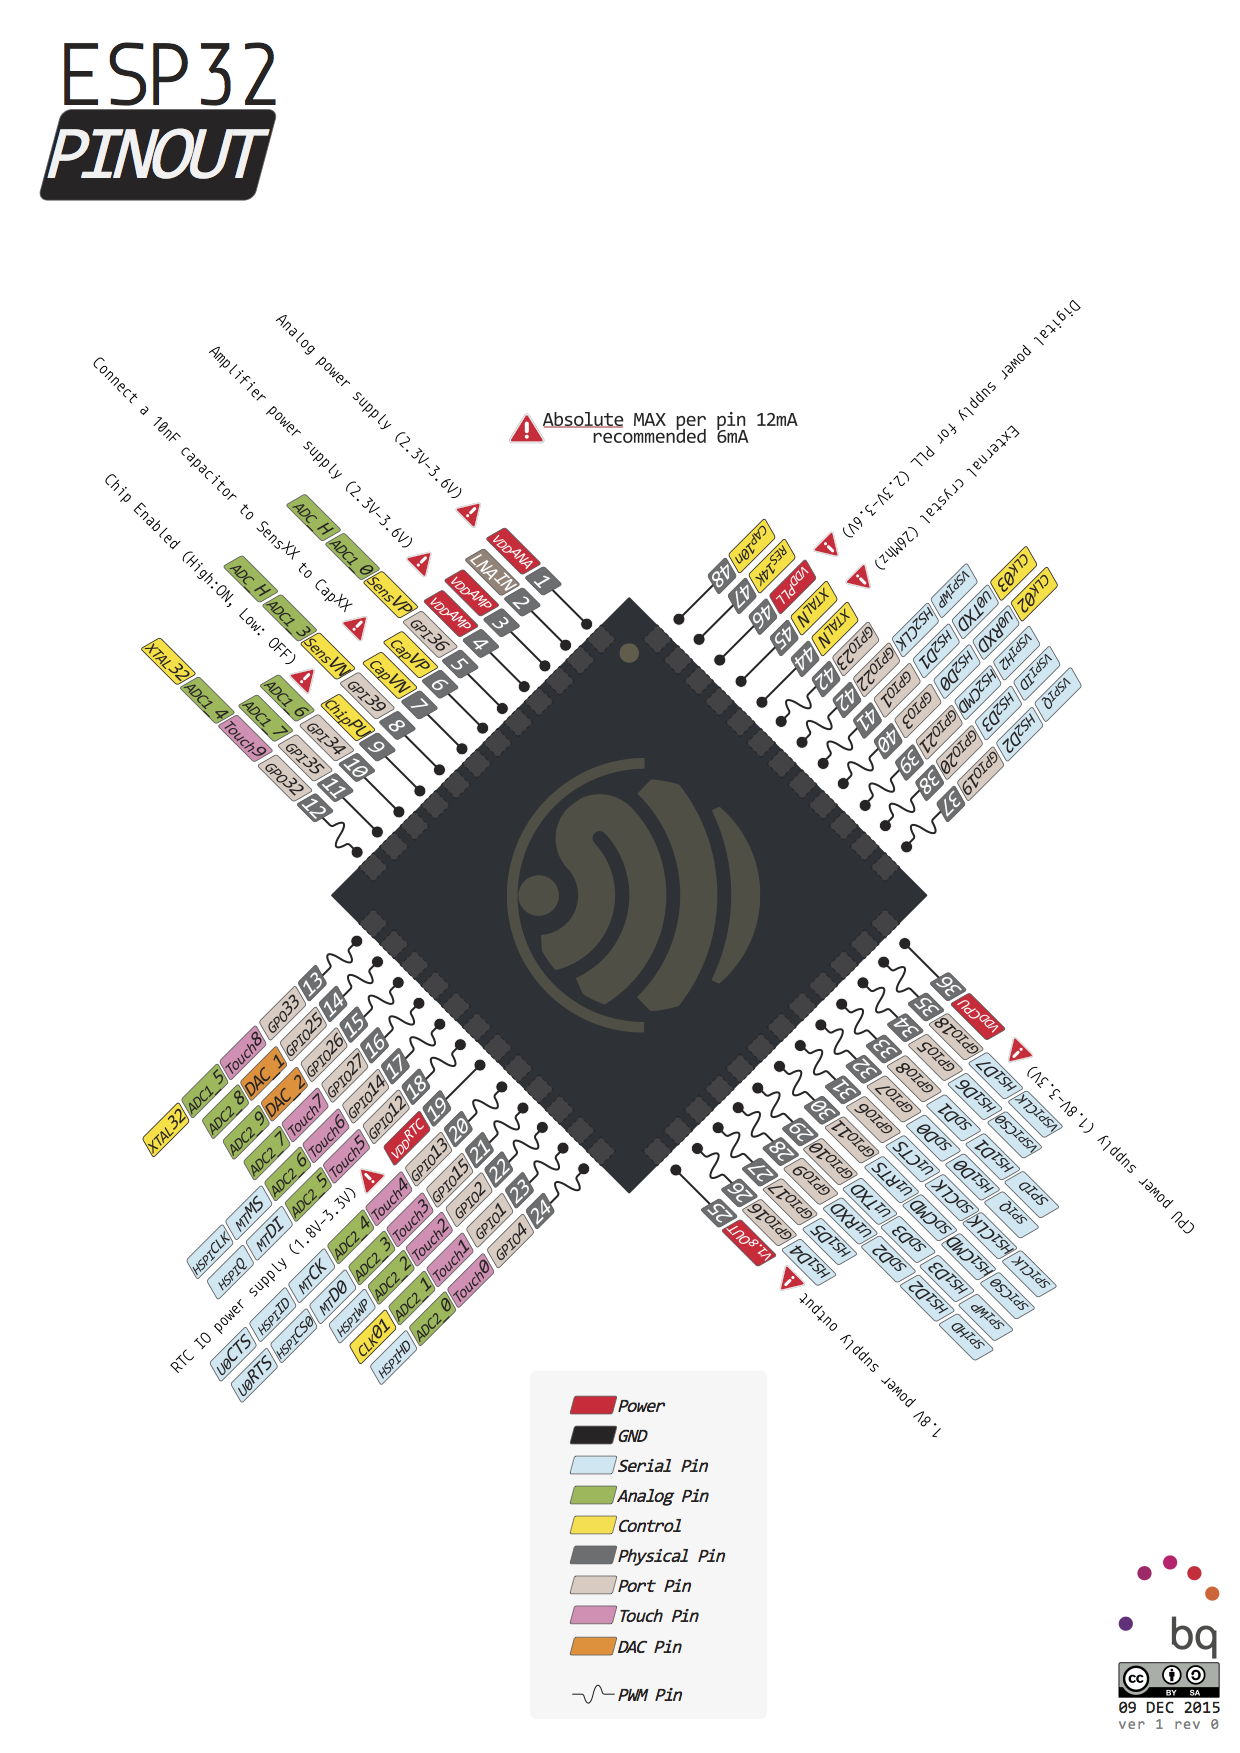
ESP32 is a low-power system-on-chip (SoC) that integrates Bluetooth and
Wifi capabilities on a single board. It is made by Espressif and has
been deployed in working IoT products. It is a good choice to learn to program to
learn basic IoT concepts.
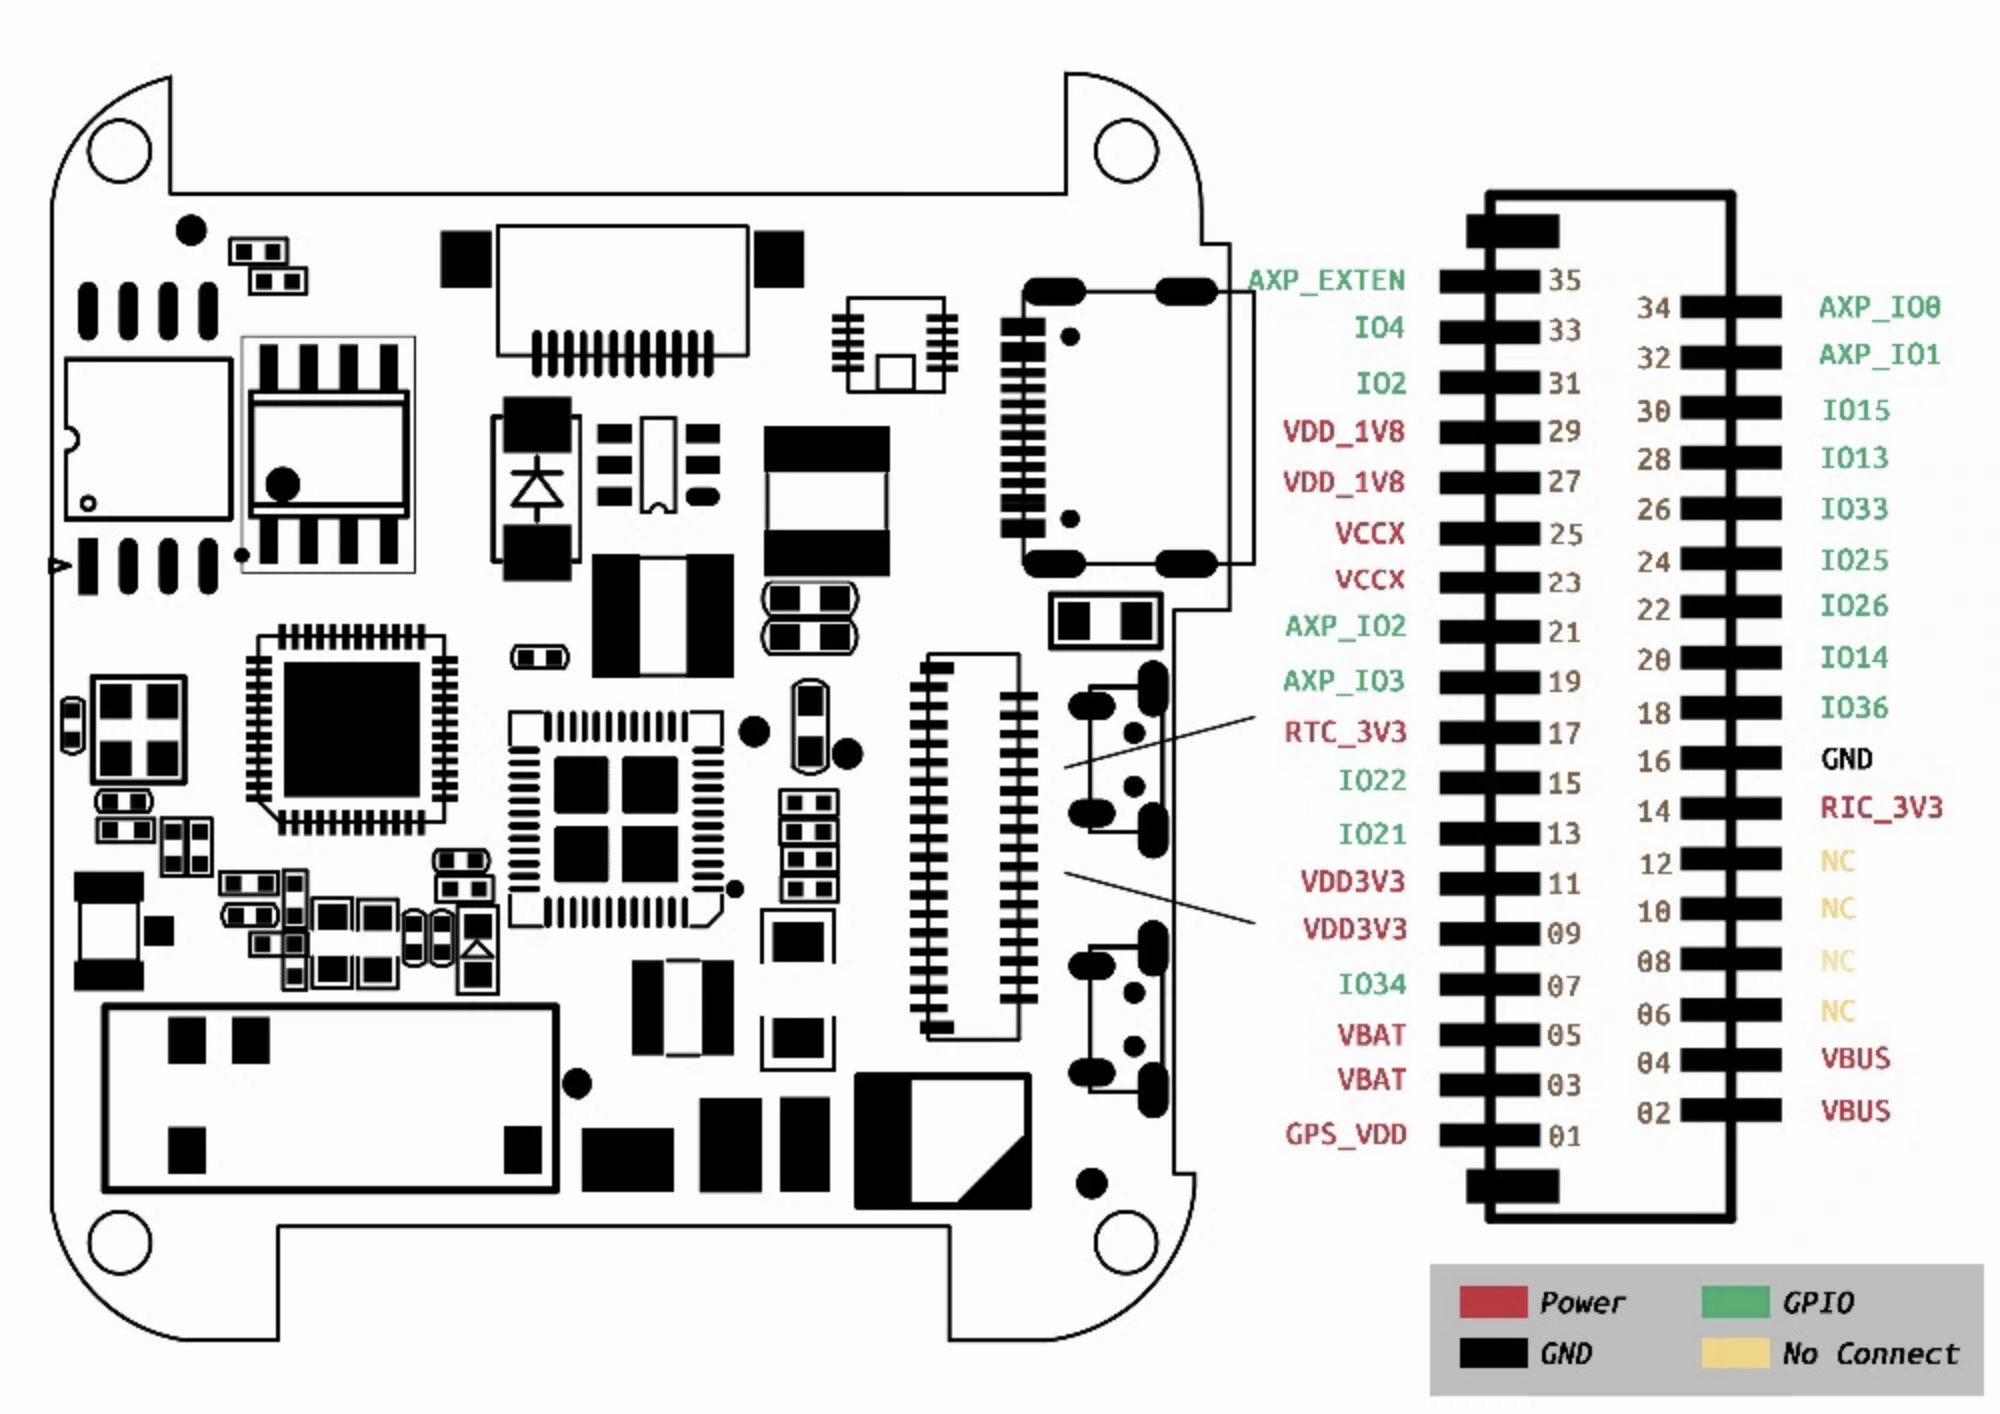
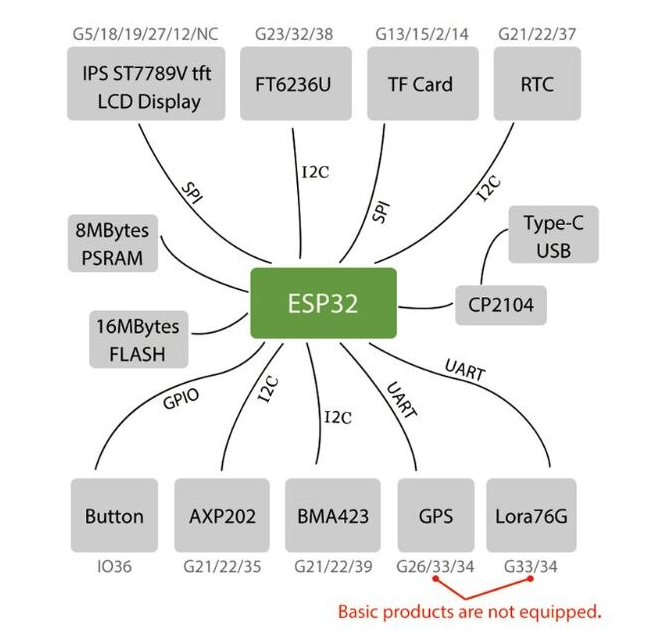
T Watch is a wearable development module that integrates ESP32 along
with many sensors. It has a USB-C interface using which it can be
charged and programmed. It has 2 free GPIOs that can be used to hook up
additional sensors.
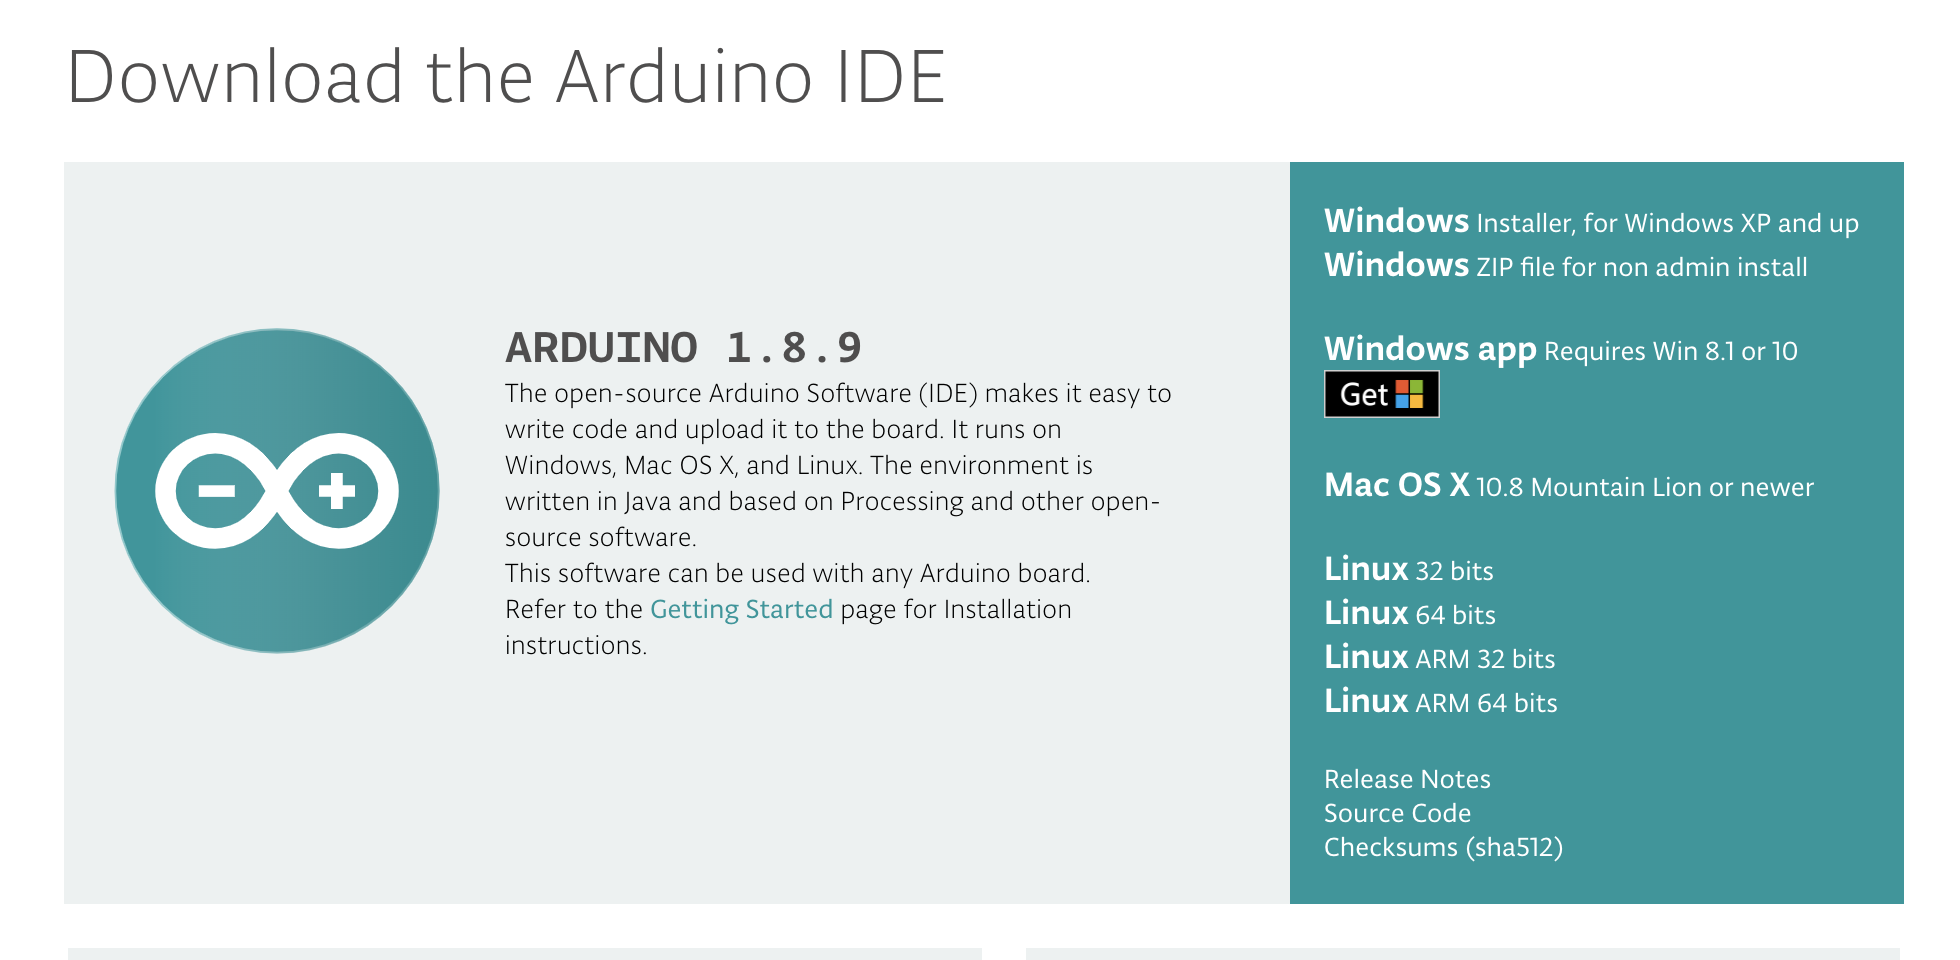
Even though we are not programming Arduino chips, we can use their
Integrated Development Environment (IDE) to program ESP32 chips. The
Arduino IDE includes:
The code in this section will be written in Arduino C++. Since this book
has introduced JS, it should be easy to transition into Arduino C++,
since both languages have borrowed syntax from C.
The T Watch has a reliable input output using the touchpad module. We
have seen how to print to the touch screen in the Hello World
example. In this section we will get user input (touches) and display
output using the
touch pad.
For debugging purposes the Serial Port will be very useful. We have already
used the serial port to write to the T-watch's program memory (when we
loaded compiled binary of helloWorld.ino). In this section we will learn to
programmatically read and write to the Serial Port.
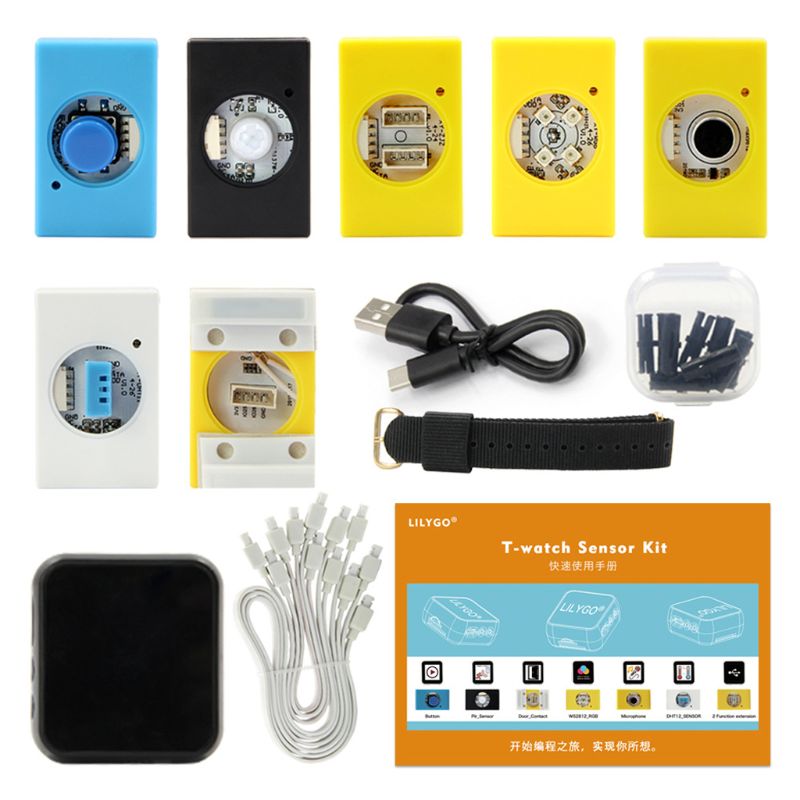
The sensor kit has modules that can be plugged into the T Watch. The
sensor kit comes with the following modules:
Button module: a switch that can control the passage or open circuit.
Pir infrared sensor module: commonly used for security alarms and automatic lighting applications. Pir sensor detects movement, but does not provide information about the motor or moving object.
Door contact sensor module: it is a device for security alarm. It consists of a wireless transmitter and a permanent magnet. It is used to detect whether doors, windows, drawers, etc. are illegally opened or moved.
RGB module ws2812: can send multiple colors by mixing the red, green and blue color.
Microphone module: is a device or transducer that converts sound into an electrical signal.
Dht11 module: it is a sensor combined with temperature and humidity detection components. The built-in processor converts the measured temperature and humidity data into digital signals and then sends the data.
Dual-function extension module: the expansion module can be freely combined with several modules.